Salon gel manicures cost $40–$80 and require an appointment every 2–3 weeks. Done at home, the same result costs under $5 per application once you have the initial kit. With the right technique, home gel nails are indistinguishable from salon work, chip-free, glossy, and lasting up to three weeks.
If you love long-lasting beauty products, you may also want to explore Best Long-Lasting Lipsticks that stay flawless all day.
Understanding Gel Nails
Gel nail polish contains photo-initiators that polymerise (harden) when exposed to UV or LED light. Unlike regular polish which air-dries, gel polish does not harden until it is cured with the lamp, which means it remains workable until you are completely satisfied with the application.
The chemistry that makes gel so durable is also what makes proper removal essential. The hardened polymer needs to be dissolved with acetone, forcing it off damages the nail plate.
Essential Equipment
The LED or UV Lamp
An LED lamp is strongly recommended over UV. LED lamps cure most gel formulas in 30–60 seconds compared to 120 seconds for UV, and LEDs last up to 50,000 hours compared to 1,000 hours for UV bulbs. Many modern gel systems require LED specifically. Choose a lamp of at least 24 watts for complete curing, underpowered lamps cause peeling.
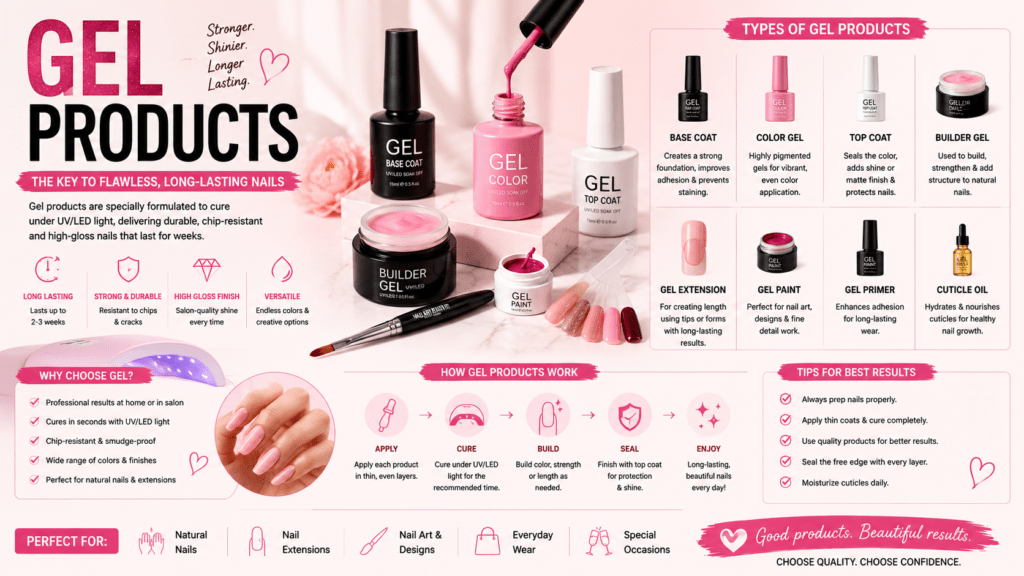
Gel Products
• Gel base coat, bonds to the natural nail, must be used
• Gel colour, thin formula; thicker than regular polish
• Gel top coat, provides high-gloss finish and UV protection
• Nail cleanser or 91%+ isopropyl alcohol, removes sticky inhibition layer after top coat
Application Tools
• Nail file (180 grit), removes shine from natural nail for adhesion
• Nail buffer (220 grit), smooths the nail surface
• Cuticle pusher or orange stick, pushes back cuticles
• Cuticle oil, essential post-removal and for nail health
• 100% pure acetone, for removal only
Step-by-Step Gel Nail Application
Step 1, Nail Preparation (Most Important Step)
Push back cuticles using a cuticle pusher. Do not cut, pushing is safer and healthier. File nails to your desired shape. Use your 180 grit file to lightly buff the entire nail surface, removing all natural shine. This roughens the surface to create microscopic texture the gel can bond to.
Wipe each nail with a lint-free pad soaked in nail cleanser or alcohol. This removes oils, dust, and moisture from the nail surface. Oil is the enemy of gel adhesion, any residue will cause lifting.
Step 2, Apply Gel Base Coat
Apply a very thin layer of gel base coat to the nail, avoiding skin and the cuticle area by approximately 1mm. Brush the gel along the free edge of the nail to seal it, this is called capping the edge and is critical for preventing lifting and tip wear.
Cure under LED lamp for the full time specified by the manufacturer (typically 30–60 seconds).
Step 3, Apply First Colour Coat
Apply a thin, even layer of gel colour. Thin coats are the most important rule in gel application, thick coats do not cure evenly and cause peeling. One thin coat should be sheer. That is correct, full coverage comes with the second coat.
Cap the free edge. Cure under LED for full time.
Step 4, Apply Second Colour Coat
Repeat with a second thin layer of gel colour. After curing the second coat, the colour should be fully opaque. If there are any gaps or unevenness, a third thin coat can be applied and cured.
Step 5, Apply Gel Top Coat
Apply a thin, even layer of gel top coat over the colour and along the free edge. Cure under LED for the full time.
After curing, wipe each nail with a lint-free pad soaked in nail cleanser or alcohol. This removes the sticky inhibition layer that remains on the surface after curing, revealing the high-gloss finish underneath. Do not skip this step.
Troubleshooting Common Gel Nail Problems
Lifting at the Cuticle
The most common issue. Causes: gel was applied too close to the cuticle or touched skin, natural nail surface was not fully degreased, or coats were too thick. Fix: ensure a 1mm gap from the cuticle, apply alcohol wipe before every coat, apply thinner layers.
Peeling After One to Two Days
Causes: insufficient surface preparation (shine not fully removed), gel not capped along the free edge, undercuring from a weak lamp, or applying gel over skin at the sides.
Bubbles in the Gel
Bubbles form when gel is applied too thick or brushed vigorously. Apply with gentle, smooth strokes and use thin coats.
Colour Appears Uneven
Usually caused by thick or uneven application. Apply in thin, even strokes from cuticle to tip. The first coat will always look sheer, this is normal.
Gel Nail Design Options at Home
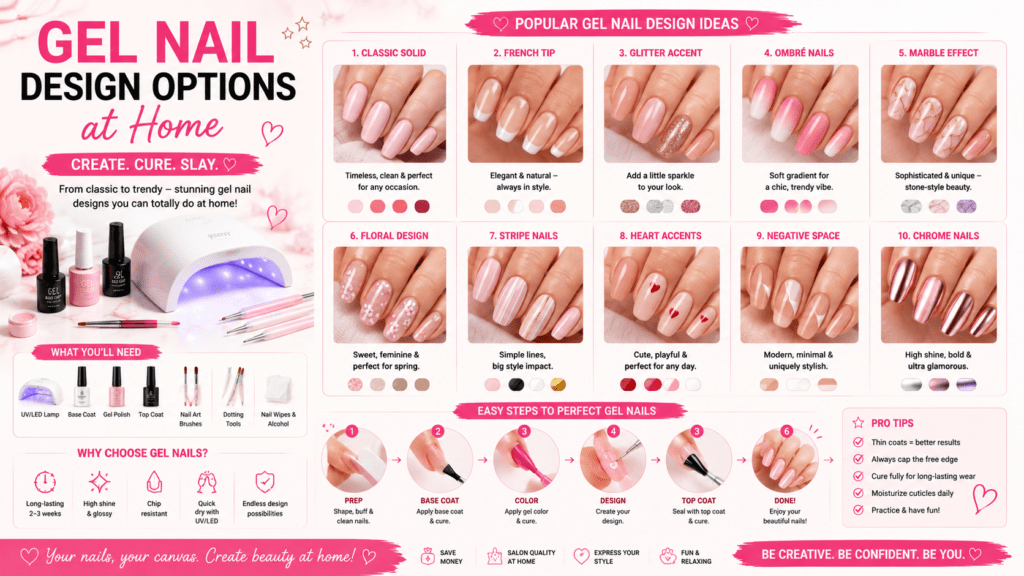
French Gel Nails
Apply a sheer pink or nude base colour and cure. Using a gel nail art brush or a very thin brush, paint a curved white line at the tip of each nail and cure. The result is a classic French manicure in gel.
Gel Ombre
Apply two uncured colours side by side onto a makeup sponge. Dab the sponge onto the nail in pressing motions. Cure after each application. Build in 2–3 layers for depth. Seal with top coat.
Gel with Nail Art
Gel is ideal for nail art because it stays workable until cured. Apply your base colour, cure, then add any nail art using a nail art brush before curing the final layer. The ability to make corrections before curing is one of gel’s greatest advantages.
If beauty precision matters to you, learning How to Apply Lipstick Perfectly Without Bleeding can be equally useful.
Safe Gel Nail Removal
29. File the top coat gently to break the seal and help acetone penetrate
30. Soak cotton pads in 100% pure acetone
31. Press a pad onto each nail and wrap tightly in foil
32. Wait 15–20 minutes
33. Slide the gel off gently using an orange stick, do not force
34. If gel remains, re-wrap and soak for an additional 5 minutes
35. Apply cuticle oil generously after removal
After gel removal, the natural nails may feel slightly dehydrated. Apply cuticle oil twice daily and consider a nail strengthener for the week before your next gel application.
Nail Health and Gel Nails
Gel nails are safe for nail health when applied and removed correctly. Beauty care goes beyond nails, and understanding Vitamin C Serum Benefits can improve your skincare routine as well. The key is: never peel, always soak off. Peeling gel removes the top layers of the nail plate, causing thinning, weakness, and white patches. With proper removal, nails can wear gel indefinitely without damage.
Take a one-week break between every three to four gel applications. Apply cuticle oil daily throughout the wear period to maintain nail plate flexibility and prevent brittleness.
Just as nails need care, following an effective Anti-Aging Skincare Routine helps maintain healthy skin.
Final Thoughts
Home gel nails are a completely learnable skill that pays for itself within a few applications. The investment is preparation technique and patience with thin coats. Once those two fundamentals are mastered, you will have professional-quality, salon-lasting gel nails whenever you want them.
Frequently Asked Questions
Q: Is it safe to do gel nails at home?
A: Yes, with proper technique and LED/UV lamp use. The main risk is improper removal, peeling gel nails rather than soaking them off causes significant damage. If you commit to proper acetone removal, home gel nails are safe for regular use.
Q: What do I need for a home gel nail kit?
A: You need: an LED or UV nail lamp, gel base coat, gel colour(s), gel top coat, alcohol wipes or nail cleanser to remove the sticky inhibition layer, nail file, cuticle pusher, and 100% acetone for removal. Some kits include all of these.
Q: How long do home gel nails last?
A: With proper application (thin even coats, capping the edge, correct cure times), home gel nails last 2–3 weeks without chipping. Preparation, removing all shine and oil from the natural nail, is the biggest factor in longevity.
Q: Why do my gel nails peel off after a day or two?
A: The most common causes are: applying coats too thick (causing lifting at the edge), not removing all shine from the natural nail before application, not capping the free edge of the nail with each coat, touching skin with gel product, or using insufficient cure time.