


The smoky eye is one of the most iconic makeup looks of all time. It is dramatic, seductive, and endlessly versatile, yet it has a reputation for being difficult. The truth is, anyone can create a beautiful smoky eye once they understand the core technique. If you’re completely new to eye makeup, start with our How to Apply Eyeshadow Beginner’s Guide first.
Unlike most tutorials that assume advanced skill, this one starts at the very beginning. By the end, you will understand not just the steps but why each step matters.
What Exactly Is a Smoky Eye?
A smoky eye uses a gradient of eyeshadow, typically transitioning from a light shade on the inner corner and brow bone, through a medium transition colour in the crease, to a deep shadow on the outer lid and lower lash line. The result mimics the natural gradient of smoke, which is where the name comes from.
The most important characteristic is seamless blending. There are no hard lines, every edge fades into the next shade. This is what separates a professional smoky eye from a messy one.
Products and Tools You Will Need
Eyeshadow
You need at least three shades: a light highlight shade, a medium transition colour, and a deep dark shade. A palette with complementary neutral tones is ideal for beginners. If you want a softer look before trying a smoky eye, check our Easy Everyday Eye Makeup Tutorial. Good options under $20 include the NYX Ultimate Shadow Palette in Warm Neutrals or the Maybelline The Nudes Palette.
Essential Tools
• Eye primer or concealer, base for the entire look
• Flat shader brush, packs colour onto the lid
• Fluffy blending brush, blends harsh edges
• Small pencil brush, detail work on lower lash line
• Clean spoolie or Q-tip, cleans up stray fallout
• Black or dark pencil liner, optional but adds definition
• Mascara, completes and frames the look
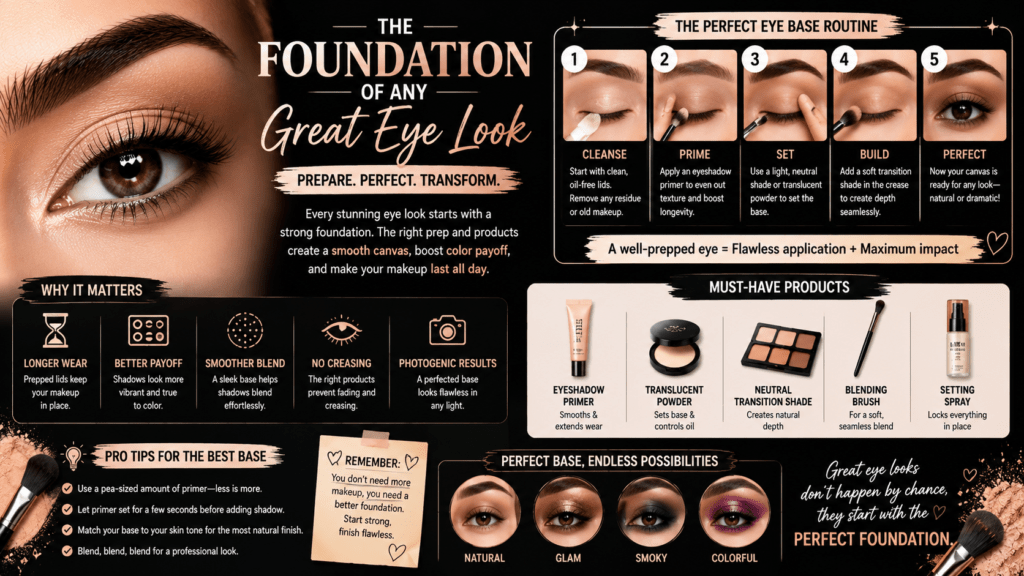
Preparation: The Foundation of Any Great Eye Look
Start with Primer
Apply a thin layer of eye primer or concealer across the entire lid from lash line to brow bone. This does three things: increases pigment payoff dramatically, prevents creasing throughout the day, and creates a smooth surface that makes blending easier.
Allow 30 seconds for the primer to set before touching it with any shadow.
Protect Your Under-Eye Area
Place a folded tissue, a business card, or two eye shadow shields under each eye at a 45-degree angle. This catches any eyeshadow fallout and prevents it from staining your foundation. Dark smoky shadows fall significantly, and cleaning them up post-application is time consuming.
The Step-by-Step Smoky Eye Technique
Step 1, Apply the Highlight Shade
Using a flat shader brush or your fingertip, apply your lightest shade across the entire lid from the lash line to the brow bone. This creates a clean, even base and helps all subsequent shades blend seamlessly.
The highlight shade also goes directly on the brow bone, the area just below your arch, to create lift and dimension. Use a slightly shimmery champagne or light beige for maximum impact.
Step 2, Build the Transition Shade in the Crease
Choose a medium shade, something in the mid-range of your palette, typically a warm taupe, soft brown, or muted mauve. Using a fluffy blending brush, apply this shade in windshield-wiper motions across the crease of your lid. The crease is the natural fold where your lid meets the socket.
The goal at this stage is to build a soft shadow that creates depth without drama. Start with a light hand and build gradually. This transition shade will blend seamlessly with both the highlight below it and the dark shade you will add next.
Step 3, Apply the Dark Shade to the Outer V
The outer V is the triangular area at the outer corner of your eye where the upper and lower lash lines meet. Using a small flat shader brush, apply your darkest shade into this outer V, pressing the colour firmly into the lid.
Then, using a fluffy blending brush, blend the dark shade from the outer corner inward across the lid, keeping most of the intensity at the outer half. The inner half of the lid should remain lighter.
Step 4, Deepen the Crease
Go back in with your transition shade and blend the edge between the dark lid colour and the crease. Use a windshield-wiper motion with a clean fluffy brush. The most common beginner mistake is stopping here with visible edges still present, keep blending until you genuinely cannot see where one colour ends and another begins.
Step 5, Line the Upper Lash Line
Apply your dark shadow along the upper lash line using a small pencil brush or the corner of your flat shader brush. Alternatively, use a dark pencil liner or gel liner. This intensifies the look and frames the eye dramatically.
For a more dramatic effect, extend the liner slightly beyond the outer corner of the eye in a small wing. If you struggle with winged liner, read our Perfect Cat Eye Makeup Tutorial.
Step 6, Apply the Dark Shade to the Lower Lash Line
Using a small pencil brush, apply the dark eyeshadow along the outer two-thirds of your lower lash line. Smudging shadow rather than liner creates a softer, more blended effect that looks more sophisticated than a hard line.
Apply a light shimmer shade to the inner third of the lower lash line and to the inner corner of the eye. This inner corner highlight is what makes the eye appear open and awake. You can also use these Makeup Tricks to Make Your Eyes Look Bigger for extra enhancement.
Step 7, Highlight the Inner Corner and Brow Bone
Using a small shader brush or your fingertip, press a shimmery champagne or white shadow directly into the inner corner of the eye where the upper and lower lash lines meet. Also reinforce the brow bone highlight from Step 1.
These two highlight points create the three-dimensional quality that makes a smoky eye look professional rather than heavy.
Step 8, Mascara and Finishing
Curl your upper lashes with a lash curler. Apply two coats of black mascara to the upper lashes, wiggling the wand at the root before pulling upward. Apply one coat to the lower lashes for additional drama.
Remove your under-eye guards and clean up any fallout using a cotton bud dipped in micellar water. A small amount of concealer pressed under the eye after clean-up brightens the area and brings the look together.
Smoky Eye Variations to Try
Classic Black Smoky Eye
Charcoal and black shades with a champagne highlight. The most dramatic version, ideal for evening events, formal occasions, and photography. Use a silver shimmer on the inner corner for a high-fashion finish.
Brown Smoky Eye (Everyday Version)
Warm brown, terracotta, and copper shades create a softer, more wearable everyday smoky eye. This pairs beautifully with a Natural Makeup Look in 10 Minutes. This is the best version for beginners to start with, the warm tones are more forgiving and look beautiful on all eye colours.

Navy and Midnight Blue Smoky Eye
Deep navy instead of black creates a unique and striking look, particularly flattering on brown eyes. Pair with silver or blue shimmer on the inner corner.
Purple Smoky Eye
Deep plum on the outer lid fading to rose in the crease. Particularly flattering on green and hazel eyes. Pair with a nude or rose-brown lip to keep the overall look balanced.
Daytime Smoky Eye
Replace the black and charcoal with soft taupe, warm beige, and a muted rose. This subtle version adds depth and definition without the drama, appropriate for work and daytime events. You can also transition this into evening glam using our Day to Night Makeup Look Guide.
Smoky Eye for Different Eye Shapes
Hooded Eyes
Hoodded eyes present the biggest challenge for smoky looks because the lid is partially covered when the eye is open. The solution: apply all shadow with your eye open, not closed. Place the dark shade higher than feels natural, it will be visible when your eye is open even if it looks very high when closed. A cut crease technique, where you blend the transition shade in a line clearly above the natural crease, dramatically opens hooded eyes.
Deep-Set Eyes
Keep the dark shade on the outer corner only and use lighter shades across the main lid. Deep-set eyes already have natural shadow in the socket, adding too much dark shade there will make the eyes appear to recede further.
Monolid Eyes
Focus the drama along the lash line rather than in the crease. A thick, smoky liner along the upper lash line fading into smudged shadow creates the smoky effect beautifully without a defined crease structure.
Common Smoky Eye Mistakes
• Not using primer, eyeshadow creases, fades, and loses pigmentation within hours
• Skipping the transition shade, creates a stark, unblended jump from light to dark
• Not protecting under-eye area, dark fallout ruins foundation
• Too much dark shade too quickly, build gradually, you can always add more
• Neglecting the inner corner highlight, the eye looks dark and closed without it
• Using too many colours, three shades done beautifully beats six shades done poorly
Setting Your Smoky Eye for All-Day Wear
Once the look is complete, lightly dust a translucent setting powder over the entire eye area using a large fluffy brush. This locks the shadow in place and prevents creasing. Follow with a setting spray misted at arm’s length. Your smoky eye should now last 8–10 hours.
Final Thoughts
The smoky eye is learnable. The technique is logical, light to dark, inner to outer, blend every edge until lines disappear. The single most transformative investment you can make is a high-quality fluffy blending brush and the patience to keep blending past what feels like enough.
Practice on a free afternoon with no time pressure. By your third attempt, the steps will feel natural and your results will genuinely surprise you.
Frequently Asked Questions
Q: What eyeshadow colours work best for a smoky eye?
A: Dark charcoal, black, and deep brown are the most classic. However, navy, plum, and forest green all create beautiful smoky eyes depending on your eye colour. The key is using three tones: light, medium, and dark, in the same colour family.
Q: How do I prevent my smoky eye from looking messy?
A: Use an eye primer to create a smooth base. Apply colours in order from lightest to darkest, blending each layer before adding the next. A clean fluffy blending brush is your most important tool, blend edges until you see no harsh lines.
Q: Can beginners do a smoky eye without eyeshadow primer?
A: You can, but the results will be less vibrant and shorter-lasting. A dab of concealer pressed onto the lid works as a decent alternative. Without any base, pigment tends to crease within a few hours.
Q: Is a smoky eye only for evening?
A: Not at all. A subtle daytime smoky eye using softer shades like taupe, warm brown, and champagne looks polished and professional. Save the black and charcoal for evenings.
Q: How long does a smoky eye last?
A: With primer, 8–10 hours. Without a primer, 4–6 hours. Setting your completed look with a light dusting of translucent powder and a setting spray extends wear significantly.