

Have you ever looked at your makeup products and wondered, “What should I apply first?”
You are not alone. Many beginners feel confused about the correct makeup order. Should you apply primer before moisturizer? Should concealer go before or after foundation? Should you do your eyeshadow before your foundation? Where does blush fit into the routine?
Using makeup in the wrong order does not always ruin your look. However, the right order can make your makeup look smoother, more natural, and easier to blend. It can also help reduce patchiness, prevent unnecessary product buildup, and make your makeup last longer.
The best makeup order usually starts with clean, prepared skin. Then you move from lightweight products to makeup products that create coverage and color. However, the exact routine can change depending on your makeup style.
For example, someone creating a simple everyday look may only need moisturizer, sunscreen, skin tint, concealer, blush, mascara, and lip color. Someone getting ready for a wedding may use more steps, including primer, foundation, contour, setting powder, eyeshadow, and setting spray.
Your skin type also matters. Dry skin may need more hydration before makeup, while oily skin may benefit from lightweight products and careful powder application.
In this guide, you will learn the correct makeup application order, where every product belongs, which steps you can skip, common mistakes to avoid, and how professional makeup artists adjust the routine for different skin types and makeup styles.
Let’s make your makeup routine simple.
What Is the Correct Makeup Order?
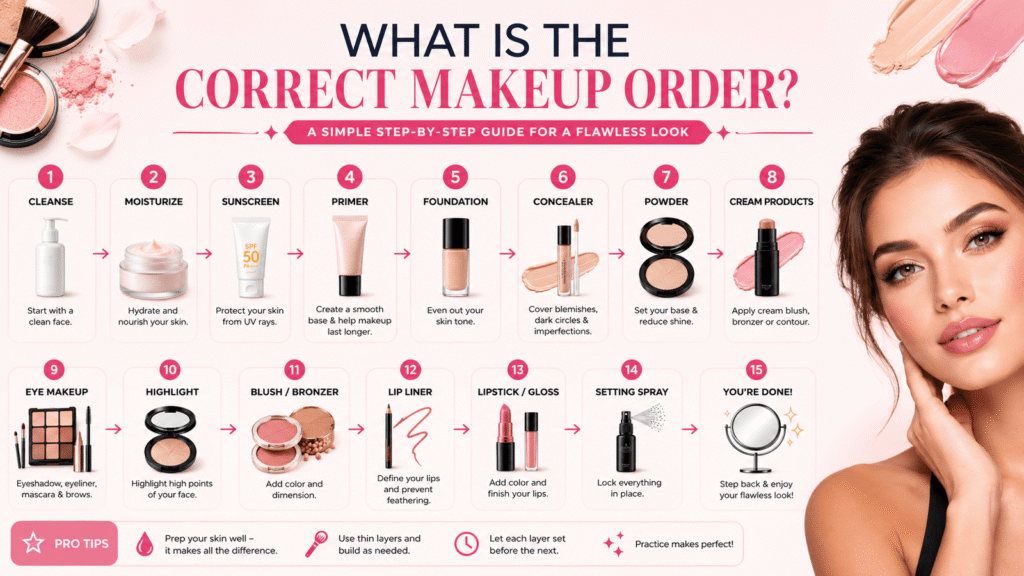
A simple makeup order usually follows this pattern:
- Cleanser
- Moisturizer
- Sunscreen
- Primer
- Eye makeup
- Color corrector
- Foundation
- Concealer
- Cream contour or blush
- Setting powder
- Powder bronzer, blush, and highlighter
- Mascara and final eye details
- Lip makeup
- Setting spray
You do not need to use every product in this list. The correct routine depends on your needs.
For example, a beginner may only use moisturizer, sunscreen, foundation, concealer, blush, mascara, and lipstick. That is completely fine.
Pro Tip: Think of makeup as layers. Start with skincare, then create your base, add color, and finish by setting everything.
Step 1: Cleanse Your Skin
The first step in your makeup order should be clean skin. A gentle cleanser helps remove excess oil, sweat, and leftover skincare or makeup.
You do not need to scrub your face aggressively before applying makeup. Harsh scrubbing can leave your skin feeling irritated and uncomfortable.
Quick Tip: Use a gentle cleanser that suits your skin type. Dry skin may prefer a gentle hydrating cleanser, while oily skin may prefer a lightweight cleanser that removes excess oil without making the skin feel tight.
After cleansing, gently pat your skin dry instead of rubbing it roughly.
Why This Step Matters
Clean skin gives your makeup a better starting point. If excess oil or old makeup remains on your face, foundation may apply unevenly.
Common Mistake: Washing your face with very hot water or using a harsh scrub immediately before makeup.
Mini Conclusion: Start with clean, comfortable skin for a smoother makeup routine.
Step 2: Apply Moisturizer
Moisturizer comes after cleansing and before makeup. It helps your skin feel comfortable and can create a smoother base.
Even oily skin often needs hydration. When skin feels dry or uncomfortable, makeup may look flaky or uneven.
Choose a moisturizer that suits your skin type. Dry skin may prefer a richer formula, while oily skin may prefer a lightweight gel or lotion.
Professional Trick: Do not apply a very thick layer of moisturizer right before makeup unless your skin truly needs it. Too much product can make makeup slide or cause pilling.
Allow your moisturizer a few minutes to settle before moving to the next step.
Expert Advice: The American Academy of Dermatology recommends choosing skincare products according to your skin type and concerns. Good skin preparation can make makeup application easier.
Step 3: Apply Sunscreen
If you are applying makeup during the day, sunscreen should come before makeup.
A broad-spectrum sunscreen helps protect your skin from ultraviolet radiation. The American Academy of Dermatology recommends broad-spectrum sunscreen with SPF 30 or higher for sun protection.
Apply sunscreen after skincare and before makeup.
Quick Tip: Allow sunscreen to settle before applying primer or foundation.
Morning Makeup Order
| Step | Product |
| 1 | Cleanser |
| 2 | Moisturizer |
| 3 | Sunscreen |
| 4 | Primer |
| 5 | Makeup |
Common Mistake: Treating foundation or makeup with SPF as a complete replacement for your regular sunscreen.
Mini Conclusion: Sunscreen is an important daytime skincare step, not just a makeup step.
Step 4: Apply Primer
The answer to is primer necessary is no. Primer is optional.
If your moisturizer and foundation already work well together, you may skip primer.
However, primer can help with specific concerns. A mattifying primer may help oily areas, while a hydrating primer may help create a more comfortable base for dry skin.
Pro Tip: Apply primer only where you need it. You do not always need to cover your entire face.
For example, use a smoothing primer around visible pores and a mattifying primer around the nose or forehead.
Common Mistake: Applying too much primer. A thick layer may cause foundation to separate.
Step 5: Do Your Eye Makeup
Many makeup artists apply eye makeup before foundation, especially when using dark or powdery eyeshadow.
This allows you to clean up any eyeshadow fallout before applying your base. If you have brown eyes and want shades that make your eye color stand out beautifully, explore our Best Eyeshadow Palettes for Brown Eyes guide to discover beginner-friendly palette recommendations.
Eye Makeup First Is Useful For:
- Smoky eyes
- Dark eyeshadow
- Glitter eyeshadow
- Heavy eye makeup
- False eyelashes
However, if you are creating a simple everyday look, you can apply your base first and then do your eyes.
Professional Makeup Artist Trick: For a dramatic eye look, do your eyeshadow first. For a quick everyday look, base-first application may be faster.
Step 6: Apply Color Corrector
Color corrector is optional.
It can help visually balance areas such as dark circles, redness, or discoloration before foundation and concealer.
Common Color Correctors
| Concern | Common Corrector |
| Redness | Green |
| Bluish dark circles | Peach or orange |
| Dull yellow areas | Lavender |
| Purple discoloration | Yellow |
Use a small amount. Too much color corrector can make your foundation look heavy.
Quick Tip: Apply color corrector only to the area that needs it.
Step 7: Apply Foundation
Foundation usually comes after primer and color corrector.
Its purpose is to even out the appearance of your complexion.
You do not always need full coverage. A skin tint or lightweight foundation may be enough for everyday makeup.
How to Apply Foundation
- Start with a small amount.
- Apply it to the center of your face.
- Blend outward.
- Add more only where needed.
- Check the finish in natural light.
Still unsure which foundation is right for your skin type? Read our Best Foundation for Beginners guide to learn how to choose the perfect formula, finish, and shade.
Pro Tip: Build coverage slowly. Applying too much foundation at once can make your makeup look heavy or cakey.
If you are unsure how to choose your shade, test foundation along your jawline and check it in natural lighting.
Step 8: Apply Concealer
In most makeup routines, concealer comes after foundation.
Why? Because foundation may already cover some discoloration. This means you may need less concealer.
Apply concealer to areas such as:
- Under the eyes
- Around the nose
- Blemishes
- Areas needing extra coverage
Professional Trick: Use a small amount and blend carefully.
Foundation vs Concealer
| Foundation | Concealer |
| Evens overall complexion | Adds targeted coverage |
| Usually applied across larger areas | Used on smaller areas |
| Creates the base | Corrects specific concerns |
Common Mistake: Using a very thick layer of concealer under the eyes.
Step 9: Apply Cream Contour and Blush
If you use cream products, apply them before setting your face with powder.
Cream products blend best over other cream or liquid products.
Cream Product Order
- Foundation
- Concealer
- Cream contour
- Cream blush
- Cream highlighter
Apply small amounts and build slowly.
Pro Tip: Cream blush can add a fresh, natural-looking finish. However, too much product can become difficult to blend.
Step 10: Set Your Makeup With Powder
Setting powder helps reduce shine and can help makeup stay in place.
You do not need to powder your entire face heavily.
Apply Powder To:
- Under the eyes
- Around the nose
- Forehead
- Areas that become oily
Dry skin may need less powder.
Oily skin may prefer more powder in areas where makeup tends to move.
Common Mistake: Applying too much powder to dry skin.
Reality Check: Powder does not automatically make makeup last longer if you apply too much.
Step 11: Apply Bronzer, Blush, and Highlighter
After setting cream and liquid products, you can add powder products.
Typical Order
- Bronzer
- Blush
- Highlighter
Bronzer adds warmth.
Blush adds color to the cheeks.
Highlighter adds brightness to selected areas.
You can adjust the order based on your style.
Professional Trick: Apply blush slightly higher on the cheeks if you want a lifted appearance.
Step 12: Complete Your Eye Makeup
If you applied eyeshadow before foundation, you may now finish your eye makeup.
This may include:
- Eyeliner
- Mascara
- Brow pencil
- Brow gel
- False lashes
For a natural everyday look, you may only need mascara and brow gel. If you love soft everyday makeup, our Natural No-Makeup Eye Look tutorial walks you through simple techniques for creating fresh, effortless eye makeup.
Quick Tip: If you curl your lashes, do it before applying mascara.
Step 13: Apply Lip Makeup
Lip makeup usually comes near the end.
A simple lip routine may include:
- Lip balm
- Lip liner
- Lipstick or lip gloss
Lip liner can help define the shape of your lips.
Pro Tip: If your lips feel dry, apply a small amount of lip balm before lipstick and allow it to settle.
Avoid applying too much balm immediately before a long-wear liquid lipstick because it may affect the finish.
Step 14: Use Setting Spray
Setting spray is usually one of the final steps.
It can help blend powder products together and create a more natural-looking finish.
Some formulas are designed for hydration, while others focus on long wear.
Quick Tip: Hold the spray at the distance recommended on the product and allow it to dry naturally.
Do not rub your face immediately after spraying.
Makeup Order for Different Skin Types
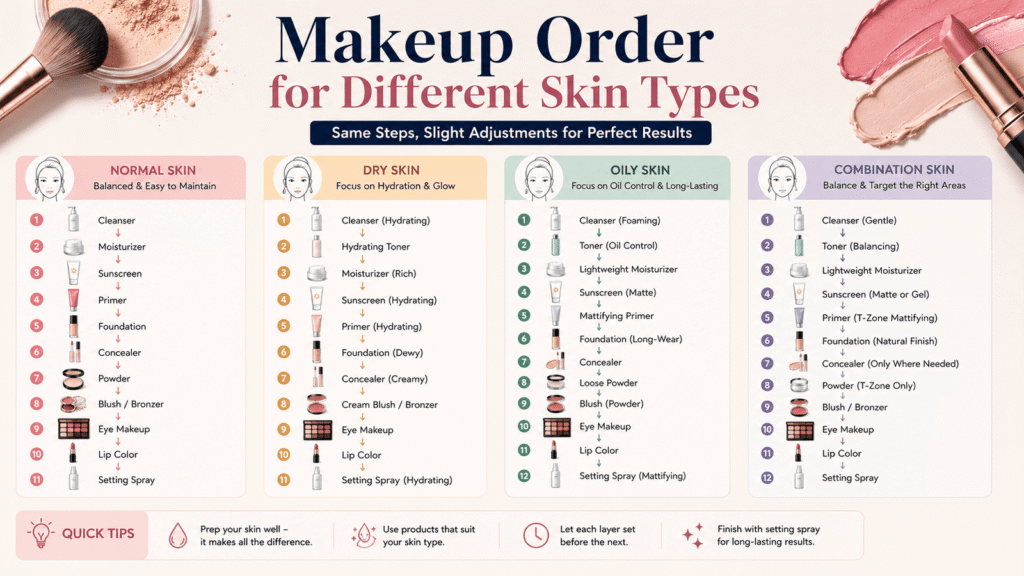
Dry Skin
A dry skin makeup routine may look like:
- Gentle cleanser
- Hydrating moisturizer
- Sunscreen
- Hydrating primer if needed
- Lightweight foundation
- Cream blush
- Minimal powder
- Hydrating setting spray
Professional Advice
Avoid applying too much powder over dry areas. Instead, focus on hydration and thin makeup layers.
Oily Skin
A routine for oily skin may include:
- Gentle cleanser
- Lightweight moisturizer
- Sunscreen
- Mattifying primer on oily areas
- Long-wear foundation
- Concealer
- Setting powder
- Powder blush and bronzer
- Setting spray
Use powder strategically instead of covering your entire face with a thick layer.
Combination Skin
Combination skin may need different products in different areas.
For example, use a lightweight moisturizer on the entire face, then apply mattifying primer only to the T-zone if needed.
Common Makeup Order Mistakes
Applying Foundation Before Skincare
Makeup should not replace basic skin preparation.
Using Too Many Products
More products do not always create better makeup.
Applying Powder Before Cream Products
Cream products usually blend better before powder.
Using Too Much Foundation
Start with a small amount and build coverage.
Skipping Sunscreen During the Day
Makeup does not replace proper sun protection.
Applying Setting Spray Too Early
Setting spray usually works best near the end of the routine.
Product Selection Guide
| Makeup Goal | Helpful Product |
| Natural skin | Skin tint |
| More coverage | Foundation |
| Dark circles | Concealer or corrector |
| Shine control | Setting powder |
| Warmth | Bronzer |
| Cheek color | Blush |
| Glow | Highlighter |
| Longer wear | Setting spray |
Choose products based on your needs rather than buying every product available.
Professional Makeup Artist Tips
Pro Tip
Apply thin layers. Thin layers usually look more natural and are easier to build.
Expert Advice
Match your skincare, primer, and foundation formulas carefully. If products do not work well together, they may pill or separate.
Quick Tip
Use clean tools. Dirty brushes and sponges can affect makeup application and skin hygiene.
Bonus Trick
Use a damp makeup sponge for a softer finish and a brush when you want more coverage.
Reality Check
You do not need a 14-step makeup routine every day.
Makeup Order Do’s and Don’ts
Do
- Start with clean skin.
- Moisturize before makeup.
- Apply sunscreen during the day.
- Use thin layers.
- Blend carefully.
- Apply cream products before powder.
- Choose products for your skin type.
Don’t
- Apply makeup over dirty skin.
- Use too much product.
- Powder dry areas heavily.
- Ignore your skin’s needs.
- Apply every product just because a tutorial does.
- Forget to remove makeup before sleeping.
Budget Makeup Tips
You can create a complete makeup look without buying dozens of products.
A simple beginner kit may include:
- Moisturizer
- Sunscreen
- Foundation or skin tint
- Concealer
- Blush
- Mascara
- Brow product
- Lip product
You can also use some products in multiple ways. For example, a cream blush may add color to your cheeks and lips if the formula is suitable for both areas.
Budget Tip: Start with products you will use regularly instead of buying products for special occasions only. Complete your beauty routine by learning How to Do Gel Nails at Home Like a Salon, a simple step-by-step guide for achieving salon-quality nails at home.
Luxury Makeup Tips
Luxury products may offer special textures, packaging, or formulas.
However, an expensive product is not automatically better for your skin.
The best product is the one that suits your skin, your routine, and your budget.
Expert Advice: Focus on formula, shade, comfort, and performance rather than price alone.
Seasonal Makeup Order Advice
Summer
Use lightweight layers and focus on oil control.
Winter
Add more hydration and avoid excessive powder.
Humid Weather
Choose products that feel comfortable and do not create a heavy base.
Dry Weather
Use moisturizer and hydrating formulas before makeup.
Your makeup order can stay mostly the same, but your product choices may change with the weather.
Common Makeup Myths
Myth: You Must Use Primer
Truth: Primer is optional.
Myth: Foundation Always Comes Before Eye Makeup
Truth: Eye makeup can come first, especially for smoky or glitter looks.
Myth: More Foundation Gives Better Coverage
Truth: Thin layers often create a more natural result.
Myth: Powder Should Cover the Whole Face
Truth: You can apply powder only where needed.
Myth: Everyone Needs the Same Makeup Order
Truth: Your skin type, makeup style, and products can change your routine.
Did You Know?
The global beauty market continues to grow, with McKinsey projecting that the industry could reach approximately $590 billion by 2030. As the beauty market expands, consumers have more makeup products and formulas to choose from than ever before.
However, more products can also create more confusion. A simple, well-planned makeup order often works better than using every product in your makeup bag.
Makeup Order Checklist
Before you start, ask:
☐ Is my skin clean?
☐ Have I applied moisturizer?
☐ Do I need sunscreen?
☐ Do I need primer?
☐ Am I using cream products before powder?
☐ Am I applying thin layers?
☐ Have I blended everything properly?
☐ Do I need setting spray?
Final Thoughts
Learning the correct makeup order can make your routine easier and less confusing.
Start with clean, prepared skin. Then move from skincare to makeup base, from cream products to powder products, and finally finish with details such as lips and setting spray.
However, remember that makeup has no single rulebook.
You can change the order based on your skin type, your makeup style, and the products you use. A beginner may need only a few steps, while a professional makeup artist may use a more detailed routine.
The most important thing is to understand what each product does.
Start simple, apply thin layers, blend patiently, and choose products that work for your skin. With practice, your makeup order will become easy, natural, and completely your own.
Frequently Asked Questions
1. What is the correct makeup order?
Start with cleanser, moisturizer, sunscreen, primer if needed, foundation, concealer, cream products, powder, eye makeup, lip products, and setting spray.
2. Should I apply primer before foundation?
Yes. Apply primer before foundation if you need it. Choose a formula based on your skin type and makeup goals.
3. Does concealer go before or after foundation?
Concealer usually goes after foundation. This helps you use less product because foundation may already cover some imperfections.
4. Should I apply cream blush before powder?
Yes. Apply cream blush, bronzer, and contour before setting powder. Powder products usually come afterward.
5. What should I apply first when doing makeup?
Start with clean skin, then apply moisturizer and daytime sunscreen. After that, use primer if needed and begin your makeup routine.