

Learning makeup should feel fun, not stressful. However, many beginners feel confused because there are so many products, brushes, techniques, and beauty trends to understand. You may watch a short makeup video online, buy the same products, and still wonder why your foundation looks orange, your concealer creases, or your makeup disappears after a few hours.
The truth is that most makeup mistakes are completely normal. Makeup is a skill. Like learning to cook or style your hair, you improve with practice. You do not need expensive products or dozens of brushes to create a beautiful look. In fact, using too many products at once can make learning harder.
One of the biggest beginner mistakes is copying a technique without considering your own skin type, face shape, eye shape, climate, or lifestyle. A makeup routine that works beautifully for someone with dry skin may look heavy on oily skin. A full-coverage routine may be perfect for a special event but uncomfortable for everyday wear.
The beauty industry continues to grow as consumers explore makeup, skincare, and personalized beauty routines. Market research has shown strong global demand for beauty and personal care products, while newer beauty trends increasingly focus on personalization and individual needs.
At the same time, professional dermatology guidance reminds us that makeup should not replace good skincare and hygiene. People with acne-prone skin can wear makeup, but choosing products labeled “non-comedogenic” or “won’t clog pores,” removing makeup before bed, and cleaning brushes regularly can help reduce problems.
So, what is the biggest makeup mistake beginners make? Usually, it is trying to do too much too soon.
This guide explains the most common makeup mistakes, why they happen, and exactly how to fix them. You will learn how to choose products, prepare your skin, apply makeup step by step, avoid hygiene problems, save money, and create a routine that looks polished without looking heavy.
1. Using Too Much Makeup Too Soon
One of the most common makeup mistakes beginners make is buying and using too many products at once. A beginner may start with foundation, concealer, contour, bronzer, blush, highlighter, setting powder, setting spray, several eyeshadows, eyeliner, false lashes, and multiple lip products. The result can feel confusing and difficult to control.
A better approach is to build your routine slowly. Start with a few products that help you create a clean, comfortable look. For example, you may only need moisturizer, sunscreen for daytime, foundation or skin tint, concealer, blush, mascara, and lip color. Once you understand how these products work, add other steps. If you’re unsure which products are actually worth buying first, explore our Makeup for Beginners: Products to Buy First guide to build a simple, beginner-friendly makeup kit without wasting money.
Real-life example: A beginner may apply heavy foundation, thick concealer, cream contour, powder contour, blush, and highlighter on the first attempt. The makeup can look uneven because each layer changes the texture underneath. A lighter routine often looks more natural and is easier to fix.
Pro Tip: Learn one new technique at a time. Practice blending foundation for a week before adding advanced contouring.
Mini conclusion: The best beginner makeup routine is not the longest one. It is the routine you can understand, control, and enjoy.
2. Skipping Skin Preparation
Many people blame their foundation when their makeup looks patchy, dry, or uneven. However, the real problem may be the skin underneath. Applying makeup to very dry, flaky, oily, or unprepared skin can make even a high-quality product look poor.
Skin preparation does not need to be complicated. Cleanse gently, apply a suitable moisturizer, and allow skincare to settle before applying makeup. During the day, sunscreen is also an important part of a healthy skincare routine.
How to Prepare Your Skin Before Makeup
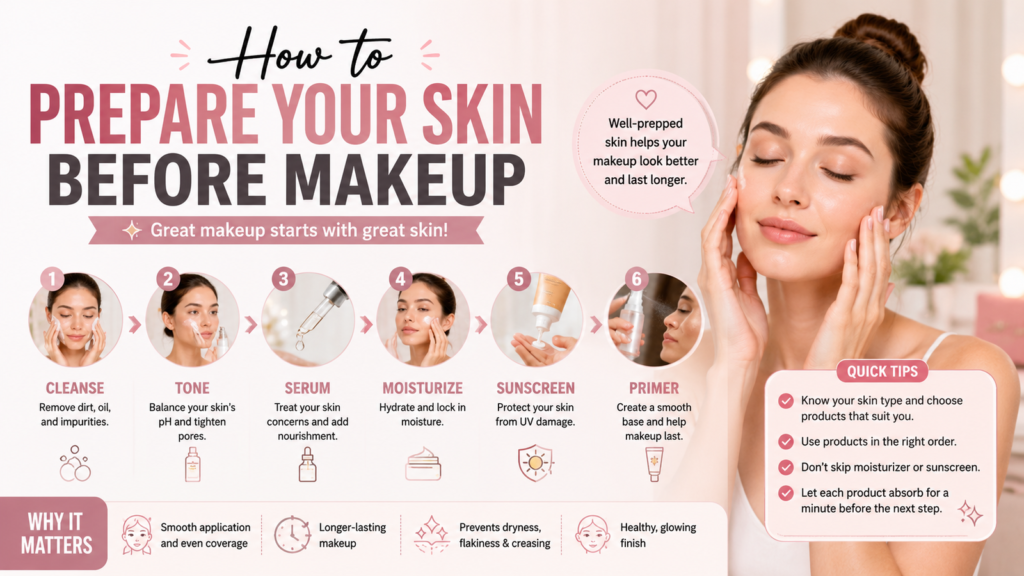
For dry skin, use a gentle cleanser and a moisturizer that helps reduce tightness. For oily skin, choose lightweight hydration instead of skipping moisturizer completely. For sensitive skin, avoid experimenting with many new products before an important event.
Before scenario: Foundation looks cracked around the nose and cheeks.
After scenario: The skin is gently cleansed, moisturized, and given a few minutes to settle. The same foundation now spreads more evenly.
Dermatologists commonly recommend gentle skincare and avoiding habits that irritate the skin. For acne-prone skin, choosing non-comedogenic products and removing makeup before bed can be especially helpful.
Quick Tip: Do not apply five heavy skincare products immediately before makeup. Too many layers can cause pilling.
Mini conclusion: Good makeup begins with comfortable skin. Skin prep is not about creating perfect skin; it is about creating a better surface for makeup.
3. Choosing the Wrong Foundation Shade
A wrong foundation shade is one of the easiest makeup mistakes to notice. The product may look too orange, pink, yellow, gray, or dark compared with the neck and chest.
Many beginners test foundation only on the hand. This is not always the best place because the skin on your hand may have a different tone from your face. Instead, test a small amount along the jawline and compare it with your neck.
How to Find Your Foundation Undertone
Your skin tone describes how light or deep your skin appears. Your undertone describes the subtle color beneath the surface. Common undertones include warm, cool, and neutral.
However, you do not need to become a color theory expert. The simplest method is to test several shades and observe which one disappears most naturally into your skin.
Common mistake: Choosing a foundation that makes the face look much lighter than the neck.
Better practice: Check your shade in natural light whenever possible. Finding your perfect match becomes much easier when you understand undertones and testing techniques. Read our How to Choose Foundation Shade for Your Skin Tone guide for a step-by-step explanation.
Budget tip: Before buying a full-size foundation, ask whether a store offers samples or smaller sizes. This can prevent wasting money on the wrong shade.
Luxury alternative: Some premium beauty counters offer professional shade matching. However, a good shade match does not always require an expensive product.
Mini conclusion: The best foundation shade is the one that blends into your face and neck without creating a visible line.
4. Applying Too Much Foundation
Another major makeup mistake is believing that more foundation always creates better coverage. Beginners often apply a thick layer to hide every mark. Unfortunately, too much product can settle into pores, lines, dry areas, and textured skin.
Professional makeup artists often build coverage gradually. Start with a thin layer and add more only where you need it. This technique creates a more natural finish and allows your real skin to look like skin.
The Thin-Layer Foundation Method
- Apply a small amount to the center of the face.
- Blend outward.
- Check your coverage in natural light.
- Add a second thin layer only where needed.
- Use concealer for small areas instead of adding more foundation everywhere.
Real-life example: If you have redness around your nose, you do not need heavy foundation on your entire face. Apply extra product only to the red area.
Reality Check: Full coverage does not mean applying the thickest possible layer. It means achieving the coverage you need.
Expert advice: A damp makeup sponge can create a softer finish, while a brush may provide more coverage. The best tool depends on the product and the result you want.
Mini conclusion: Start light, build slowly, and let your skin remain visible.
5. Using Concealer Incorrectly
Many beginners use concealer as if it were a magic eraser. They apply thick layers under the eyes, around the nose, and over every blemish. This can create heavy, creased makeup.
Concealer works best when used with purpose. Use a small amount on areas that genuinely need extra coverage. For blemishes, gently tap the product instead of repeatedly rubbing it away.
Under-Eye Concealer Mistakes
The under-eye area is delicate and naturally has movement. Too much product can crease quickly. A thin layer is often better than a thick layer.
For dark circles, choose a concealer that offers suitable coverage without becoming too dry. For a blemish, matching the surrounding skin tone often looks more natural than using a very bright concealer.
Common mistake: Using a very light concealer under the eyes and creating a bright white triangle.
Better practice: Use a shade that brightens gently while still looking close to your natural skin tone.
Bonus Trick: Apply concealer only where darkness is strongest, then blend the edges. You may need much less product than you think.
Mini conclusion: Concealer should target specific concerns, not cover your entire face.
6. Forgetting to Blend
If there is one skill every beginner should practice, it is blending. Unblended foundation, blush, contour, eyeshadow, and concealer can make makeup look harsh.
Blending does not mean rubbing until all color disappears. It means softening the edges so the product transitions naturally into the surrounding area.
How to Know When Makeup Is Blended
Look at your makeup from different angles. Check it in natural light and with your face relaxed. If you can clearly see where blush, contour, or foundation begins and ends, the edges may need more blending.
A professional makeup artist trick is to use a clean brush at the edges of a product. This can soften harsh lines without adding more color.
Before: A dark contour stripe is visible beneath the cheekbone.
After: The same contour is softly blended upward, creating gentle dimension.
Pro Tip: When you think you are finished blending, blend the outer edges one more time.
Mini conclusion: Good makeup should look connected, not like separate colored sections.
7. Using Too Much Powder
Powder can help reduce shine and set makeup. However, using too much can create dry, heavy, or cakey makeup.
Beginners often powder the entire face heavily because they fear shine. Yet some natural skin glow can make makeup look fresh. Instead of applying powder everywhere, focus on areas that become oily or where makeup tends to move.
Powder Guide by Skin Type
| Skin Type | Best Powder Approach |
| Oily | Focus on the T-zone and areas that become shiny |
| Dry | Use very little powder and avoid dry patches |
| Combination | Powder oily areas and leave dry areas lighter |
| Sensitive | Choose gentle products and avoid excessive layers |
| Normal | Use powder only where needed |
Common mistake: Applying powder over dry, flaky skin without improving the underlying dryness.
Expert advice: Press powder gently rather than aggressively rubbing it across the face.
Quick Tip: If your makeup looks too powdery, a light mist of setting spray may help the layers look more natural.
Mini conclusion: Powder should control makeup, not hide the natural texture of your skin.
8. Applying Blush, Bronzer, and Contour Incorrectly
Blush, bronzer, and contour have different purposes. A common beginner makeup mistake is treating them as the same product.
Bronzer usually adds warmth. Contour creates the appearance of shadow and dimension. Blush adds color and freshness. Using all three in the wrong places can make the face look muddy.
Simple Placement Guide
- Blush: Adds color and freshness to the cheeks.
- Bronzer: Adds warmth where the sun may naturally touch the face.
- Contour: Adds subtle shadow to create dimension.
- Highlighter: Adds light to selected high points.
The best placement depends on your face shape and personal style. You do not need to follow one universal rule.
Real-life example: A beginner may apply dark contour directly below the cheek and leave a visible line. A softer product applied gradually can create a more natural effect.
Pro Tip: Use less product than you think. You can always add more, but removing too much can disturb your foundation.
Mini conclusion: Color placement matters more than owning many face products.
9. Making Eye Makeup Too Heavy
Eye makeup can transform a look, but beginners often apply too much dark eyeshadow or eyeliner too quickly. A heavy black line around the entire eye can sometimes make the eyes appear smaller.
For a simple everyday look, begin with a soft neutral shade. Add definition gradually. If you use eyeliner, start with a thin line and increase the thickness only if you like the result.
Common Eye Makeup Mistakes
- Applying dark shadow without blending.
- Using too much black eyeliner.
- Forgetting to curl lashes before mascara.
- Applying too many mascara layers.
- Using old mascara.
- Applying eyeshadow without considering eye shape.
Before: A thick dark line surrounds the eye and makes the look feel heavy.
After: A softer line and blended eyeshadow create definition without overwhelming the eyes.
Expert Advice: Apply eye makeup with your eyes open occasionally. This helps you see how the makeup actually looks when you are naturally looking forward.
Mini conclusion: Eye makeup does not need to be dramatic to be beautiful.
10. Ignoring Makeup Hygiene
Makeup hygiene is often overlooked, but it is an important part of a safe beauty routine. Dirty brushes can collect oil, makeup residue, dead skin cells, and other buildup.
The American Academy of Dermatology recommends cleaning makeup brushes regularly and avoiding sharing makeup and applicators. Sharing can also spread certain contagious eye or skin infections.
Beginner Makeup Hygiene Checklist
- Clean frequently used brushes regularly.
- Do not share mascara or eye products.
- Avoid using products that smell or look different from when you bought them.
- Keep makeup containers closed.
- Wash your hands before applying makeup.
- Do not use makeup on irritated skin without understanding the cause.
Common mistake: Keeping the same mascara for too long because it still seems usable.
Best practice: Follow the product’s recommended period-after-opening guidance where available.
Did You Know? A beautiful makeup routine is not truly complete if your tools and products are not kept clean.
Mini conclusion: Hygiene protects your skin and helps your makeup tools perform better.
11. Sleeping in Makeup
Sleeping in makeup is one of the most common beauty mistakes. Even if you feel too tired to complete your full nighttime routine, removing makeup before bed is important.
Makeup can mix with oil, sweat, and environmental debris throughout the day. The American Academy of Dermatology advises removing makeup before bed, including eye makeup, and cleansing gently rather than scrubbing aggressively.
A Simple Tired-Night Routine
- Remove makeup gently.
- Cleanse your face.
- Apply a simple moisturizer if your skin needs it.
You do not need a ten-step routine every night. Consistency is often more helpful than complexity.
Reality Check: One forgotten night does not mean you have ruined your skin. The problem is making sleeping in makeup a regular habit.
Mini conclusion: Removing makeup is one of the easiest habits that can improve your overall beauty routine.
12. Choosing Products Without Considering Skin Type

A product can look beautiful on one person and completely different on another. Skin type, climate, skincare, and product texture all influence the final result.
For example, a rich foundation may look beautiful on dry skin but feel heavy on oily skin. A very matte formula may emphasize dry patches. People with acne-prone skin may prefer products labeled non-comedogenic. Dermatologists commonly recommend choosing makeup and skincare products that are less likely to clog pores when acne is a concern.
Product Selection Guide
| Skin Concern | Look For | Be Careful With |
| Dryness | Hydrating textures | Excessive matte products |
| Oiliness | Lightweight, long-wear formulas | Very heavy layers |
| Acne-prone skin | Non-comedogenic products | Products that repeatedly trigger breakouts |
| Sensitivity | Simple, gentle formulas | Frequent product switching |
| Combination skin | Targeted application | Treating the entire face the same way |
Expert advice: Your skin can change with weather, hormones, age, and lifestyle. Do not assume you need the same makeup routine all year.
Mini conclusion: Choose makeup based on your skin’s current needs, not only on what is popular online.
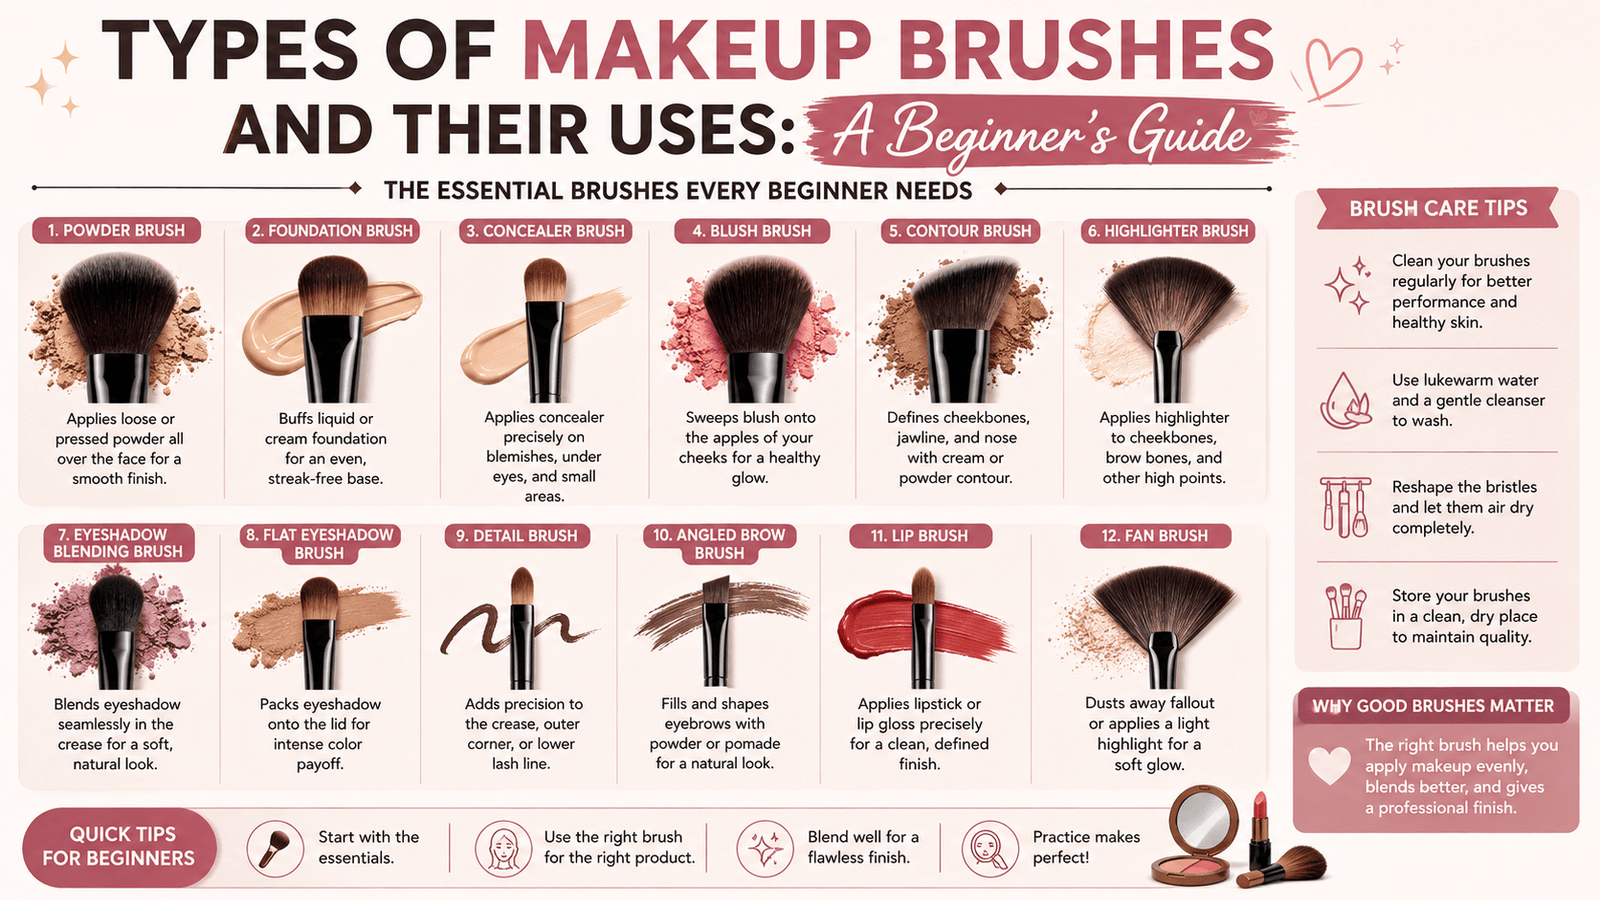
13. Using the Wrong Tools and Brushes
You do not need a huge brush collection to create beautiful makeup. However, using the wrong tool can make application harder.
A foundation brush, makeup sponge, blush brush, and eyeshadow blending brush are enough for many beginners. Clean fingers can also work well for certain cream products.
Basic Beginner Tool Kit
- Foundation brush or sponge
- Concealer brush or clean fingertip
- Blush brush
- Fluffy eyeshadow brush
- Small detail brush
- Eyelash curler
- Clean makeup mirror
Budget tip: Buy fewer, better-quality tools instead of a large inexpensive set that you never use.
Luxury alternative: Professional brush sets may offer specialized shapes and high-quality materials, but technique still matters more than price.
Mini conclusion: The right basic tools can make makeup easier, but no tool can replace practice.
14. Following Trends Without Understanding Your Face
Beauty trends can be fun, but copying every trend exactly is a common makeup mistake. A technique that looks beautiful on one face may need adjustment for another.
For example, the placement of blush, eyeliner, or contour may change depending on face shape and personal preference. Instead of asking, “What is the correct way to do makeup?” ask, “What placement makes me feel confident and comfortable?”
A Better Way to Follow Trends
- Learn what the trend is designed to achieve.
- Understand the technique.
- Adapt the placement to your features.
- Use less product at first.
- Check the result in normal lighting.
Common myth: There is only one correct makeup style.
Reality: Makeup is creative. Professional techniques are useful, but they should help you understand your face, not make you feel forced to change it.
Mini conclusion: Use trends as inspiration, not strict rules.
15. Buying Too Many Products
Buying makeup can be exciting. However, beginners often purchase products before learning what they actually need.
A better buying strategy is to create a small routine and test each product. If you love a formula, then consider adding more shades or advanced products.
Beginner Makeup Buying Guide
| Product | Beginner Priority |
| Moisturizer | High |
| Daytime sunscreen | High |
| Foundation or skin tint | Medium to high |
| Concealer | Medium |
| Blush | High |
| Mascara | High |
| Lip product | High |
| Contour | Optional |
| Highlighter | Optional |
| Eyeshadow palette | Optional |
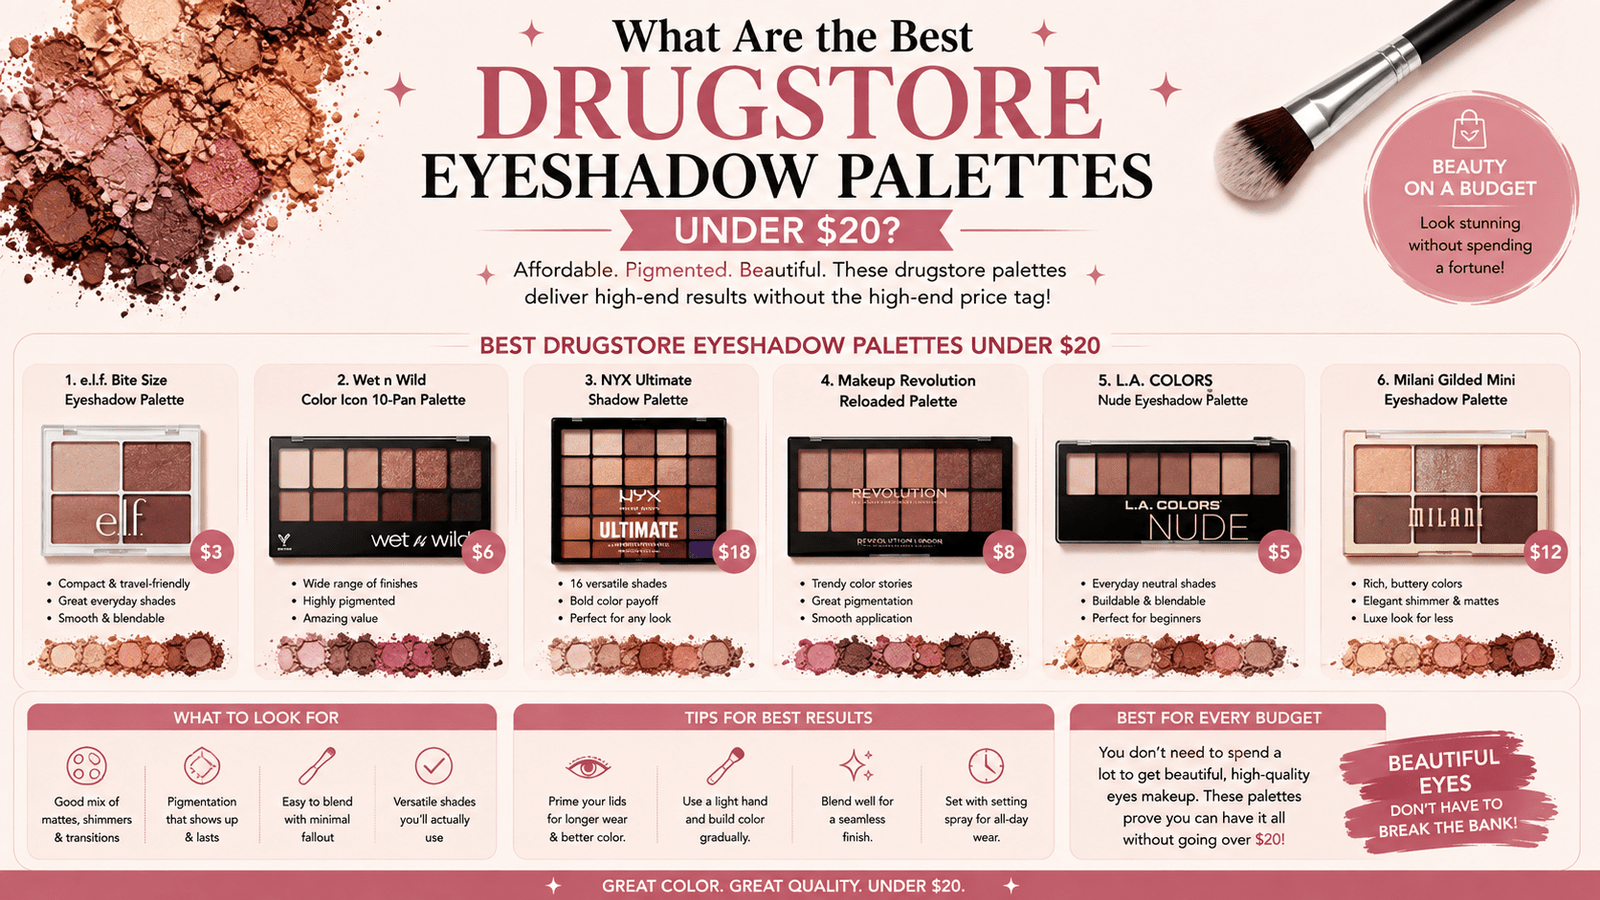
Budget advice: Spend more on products you use every day and less on products you use occasionally. You do not need luxury makeup to create a polished look.
Bonus Trick: Before buying a new product, ask yourself: “What problem will this solve in my routine?”
Mini conclusion: Smart shopping is better than collecting products you do not use.
16. Makeup Mistakes for Different Skin Types
Dry Skin
Dry skin often looks worse when covered with too much powder or heavy matte makeup. Beginners may try to hide dryness instead of improving comfort first.
Use gentle skin preparation, lightweight layers, and cream products when they suit your skin. Avoid applying thick foundation over flaky areas without addressing the underlying dryness.
Professional trick: Apply thin layers and press products gently rather than rubbing them across the skin.
Oily Skin
People with oily skin often make the opposite mistake: using too much powder and very drying products. This can make the makeup look heavy or uncomfortable.
Instead, use lightweight layers and apply powder mainly where shine appears. A long-wear base can help, but excessive product may still move throughout the day.
Combination Skin
Combination skin often needs a targeted approach. The T-zone may become oily while the cheeks feel normal or dry.
You do not have to use the same amount of product everywhere. Apply more oil-control products where needed and lighter layers on drier areas.
Acne-Prone Skin
Acne-prone skin can still wear makeup. Dermatologists recommend paying attention to labels such as “non-comedogenic” or “won’t clog pores,” removing makeup before bed, and cleaning brushes regularly.
Avoid constantly changing products when your skin is reacting. If breakouts continue or become painful, professional dermatology advice may be helpful.
17. A Beginner-Friendly Makeup Routine
Follow this simple order:
- Cleanse gently.
- Moisturize.
- Apply daytime sunscreen when appropriate.
- Use primer only if it helps your skin or makeup goal.
- Apply a thin layer of foundation or skin tint.
- Use concealer only where needed.
- Apply blush, bronzer, or contour lightly.
- Set selected areas with powder if necessary.
- Apply eyeshadow and eyeliner.
- Curl lashes and apply mascara.
- Apply lip color.
- Check your makeup in natural light.
Morning vs Night Routine
| Morning | Night |
| Cleanse | Remove makeup |
| Moisturize | Cleanse |
| Sunscreen | Apply suitable skincare |
| Makeup | Moisturize if needed |
The key is not to make your routine complicated. A beginner should focus on learning how each product behaves.
Mini conclusion: A simple routine gives you more control and makes it easier to identify what works.
18. Common Makeup Myths
Myth 1: More Foundation Means Better Skin
More foundation creates more coverage, but it does not always create a better finish. Thin layers often look more natural.
Myth 2: Primer Is Necessary for Everyone
Primer can be useful, but not everyone needs it. If your skincare and foundation already work well together, you may not need an extra step.
Myth 3: Expensive Makeup Is Always Better
Price does not guarantee the perfect formula, shade, or finish. A less expensive product may work beautifully for your skin.
Myth 4: You Must Follow Every Makeup Rule
Makeup techniques are helpful guides, not laws. You can adapt them to your preferences.
Myth 5: Acne Means You Cannot Wear Makeup
People with acne can wear makeup. Product choice, hygiene, gentle application, and proper removal matter.
19. Seasonal Makeup Advice
Summer
Heat and humidity can make makeup move faster. Use lightweight layers and avoid applying unnecessary products.
Winter
Cold, dry weather may make skin feel tight or flaky. Focus on comfortable hydration and avoid excessive powder.
Spring
Allergies and changing weather can affect skin comfort. Keep your routine simple if your skin becomes sensitive.
Autumn
This can be a good time to adjust foundation texture and lip products as the weather becomes cooler.
Expert advice: Your makeup routine should change when your skin’s needs change.
20. Do’s and Don’ts Checklist
| Do | Don’t |
| Prepare your skin | Apply makeup to very dry skin without care |
| Test foundation shades | Choose a shade only from online photos |
| Blend carefully | Leave harsh product edges |
| Clean your brushes | Use dirty tools repeatedly |
| Remove makeup before bed | Sleep in makeup regularly |
| Build coverage slowly | Apply thick layers immediately |
| Choose products for your skin | Copy every trend blindly |
| Practice regularly | Expect perfection on the first try |
21. Professional Makeup Artist Tips Beginners Should Remember
- Apply less product first.
- Use natural light when checking your makeup.
- Blend the edges, not just the center.
- Keep your skin comfortable.
- Use separate products for different purposes.
- Do not rush your routine.
- Practice before an important event.
- Keep your tools clean.
- Learn from your mistakes instead of throwing away everything.
- Take photos to see how makeup looks in different lighting.
If your makeup tends to fade, crease, or separate throughout the day, check out our How to Make Makeup Last All Day guide for practical tips to improve wear time.
Pro Tip: If your makeup looks wrong, do not immediately remove everything. First identify the problem. Is the issue the shade, amount, texture, placement, or blending?
22. Makeup Mistakes: Before and After Examples
Foundation
Before: Thick foundation is applied everywhere.
After: A thin layer is applied first, followed by targeted coverage.
Blush
Before: Too much blush is placed in one area.
After: A small amount is blended gradually.
Concealer
Before: A thick bright triangle is placed under both eyes.
After: A thin amount is applied only where darkness needs extra coverage.
Powder
Before: The entire face is heavily powdered.
After: Powder is applied mainly to areas that need oil control.
These small changes can make a major difference without requiring new products.
Final Thoughts
Learning makeup is a journey, and making mistakes is part of the process. Your foundation may look too heavy one day. Your eyeliner may be uneven. Your blush may be brighter than expected. That does not mean you are bad at makeup.
Every mistake teaches you something about your skin, your products, and your personal style.
The best beginner makeup routine is simple, comfortable, and suited to you. Focus on healthy skin preparation, gentle application, clean tools, suitable products, and regular practice. If you have acne or sensitive skin, pay close attention to how products affect your skin and consider professional dermatology advice when needed.
You do not need to follow every trend. You do not need the most expensive products. You do not need perfect skin.
You simply need patience, practice, and the confidence to keep learning.
Start small. Apply less. Blend more. Learn what works for your skin.
And remember: the goal of makeup is not to hide who you are. It is to help you express yourself, feel confident, and enjoy the process.
Frequently Asked Questions
1. What is the biggest makeup mistake beginners make?
Using too much product. Start with small amounts and build coverage gradually.
2. Why does my foundation look cakey?
Too much product, dry skin, excessive powder, or poor skin preparation can cause a cakey finish.
3. Should beginners use primer?
Not always. Use primer only if you need specific benefits like hydration, smoothing, or longer wear.
4. How can I stop my makeup from looking patchy?
Prepare your skin, use thin layers, and blend gently with clean tools.
5. Why does my concealer crease under my eyes?
Too much product, dryness, and excess powder can cause creasing. Use a thin layer.