

Highlighter is one of the most transformative products in makeup when used correctly, it adds dimension, luminosity, and a healthy glow that makes skin look alive. Used incorrectly, it creates obvious stripes of glitter on the face.
This guide covers the principles of highlighting, the best placement techniques, and how to choose the right formula for a genuinely natural finish. For an even more radiant complexion, start with a dewy glass skin makeup routine before applying highlighter to create a healthy, lit-from-within glow.
The Science Behind Highlighting
Highlighting works on a simple optical principle: lighter areas appear to come forward, darker areas recede. By placing light-reflecting products on the high points of the face that naturally catch the most light, you amplify and direct the viewer’s eye toward the most flattering angles of your face.
Highlighter Formulas
Powder Highlighter
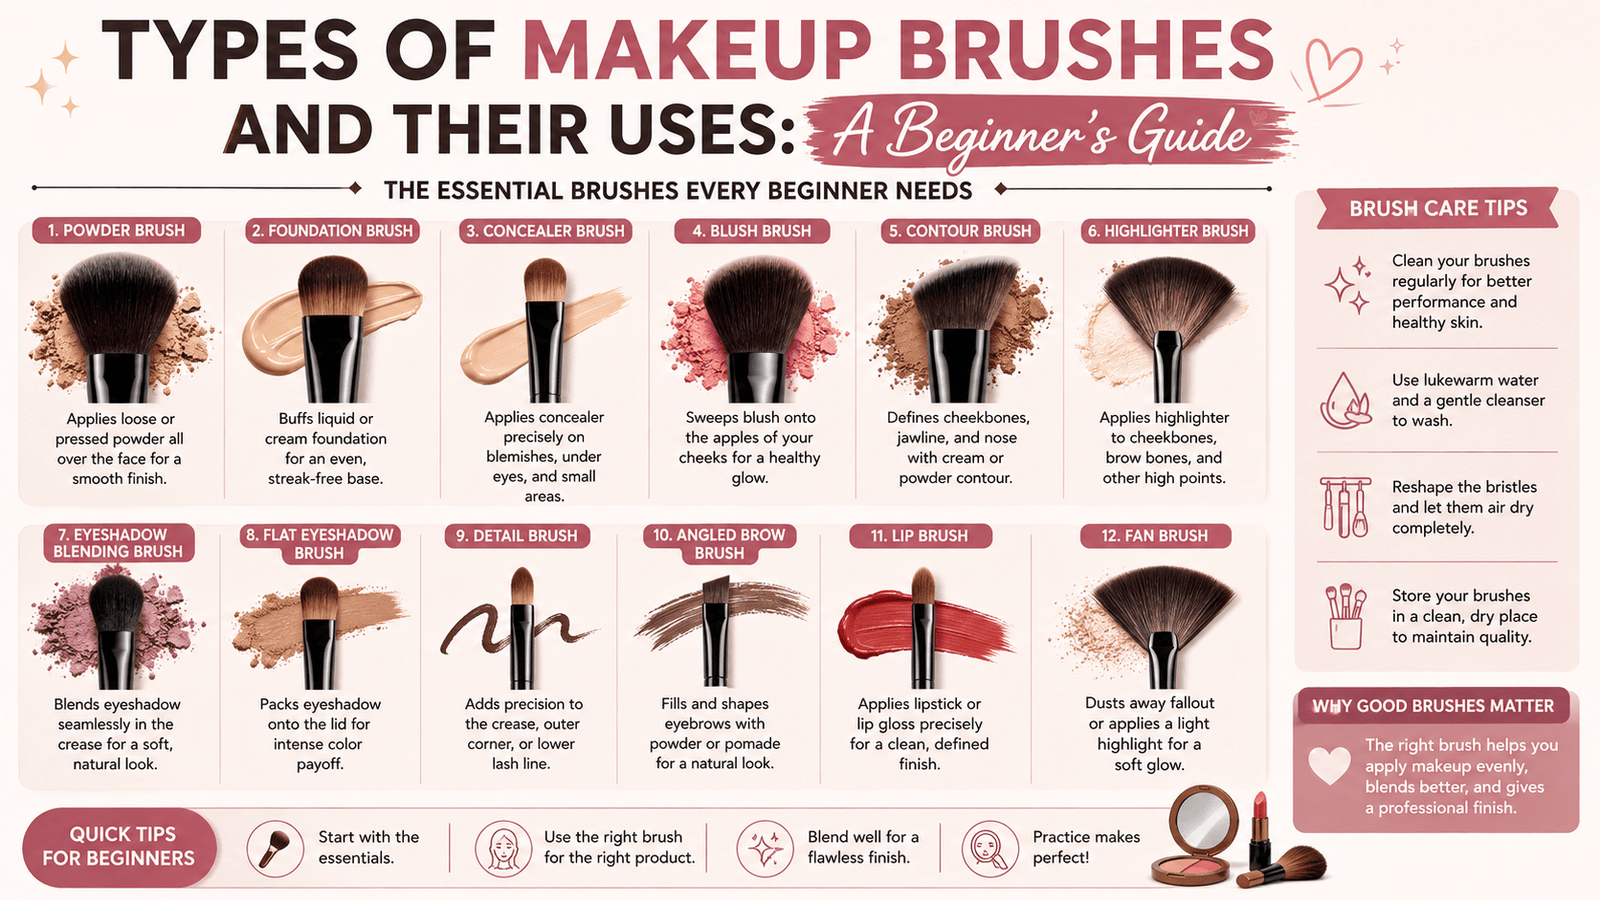
The most popular format. Applied with a fan brush or small dome brush, powder highlighter is easy to control and build. Compact and travel-friendly. Best for oily to normal skin, the powder absorbs some moisture and prevents the highlight from looking greasy.
Cream Highlighter
Applied with fingers or a brush, cream highlighter fuses into the skin for the most natural result. Works best applied before or mixed into powder products. Particularly flattering on dry skin where it does not emphasise texture. Well-hydrated skin creates the smoothest finish for cream highlighters, making a consistent anti-aging skincare routine an important part of achieving a natural glow.
Liquid Highlighter
Can be mixed into foundation for an all-over glow, applied as a standalone product, or layered on top of makeup. Fenty Beauty Killawatt Freestyle, Charlotte Tilbury Hollywood Flawless Filter, and Too Faced Lip Injection Glossy are popular options. Applying a Vitamin C serum underneath your daytime makeup can help brighten dull-looking skin and enhance your overall glow before highlighter is applied.
Shimmer Powder (as Highlighter)
A champagne or gold shimmer eyeshadow applied with a flat brush to the cheekbones works identically to a dedicated highlighter. This is particularly useful for beginners who do not want to buy a dedicated highlighting product.
Step-by-Step Highlighting Technique
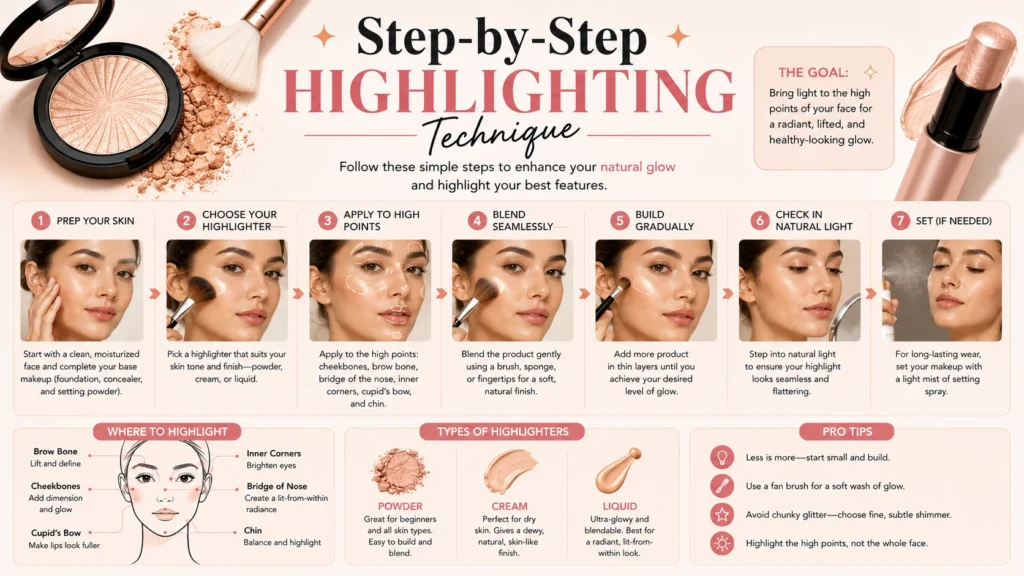
Step 1, Cheekbones
Apply highlighter to the very top of the cheekbone, the sharp ridge directly below the outer corner of the eye. This is the point that catches the most natural overhead light. Use a small dome or fan brush and apply with a light, pressing motion rather than sweeping. Build gradually, you can always add more.
The most common mistake is applying too low. Test the position: look in a mirror from eye level, the highlight should be directly below the outer corner of your eye, not lower on the apple of the cheek.
Step 2, Brow Bone
Apply a lighter shimmer or matte highlight shade directly below the arch of each brow. This creates lift and makes the eyes appear more open. Use a small fluffy brush and a light hand, this highlight should be subtle.
Step 3, Inner Corner of Eyes
Using your fingertip or a small pointed brush, press a shimmer shade into the very inner corner of each eye. This step opens and brightens the eyes dramatically. A shimmery champagne or white works best.
Step 4, Bridge of the Nose
Using a small fan brush, dust a fine highlight along the bridge of the nose from between the brows to the tip. This creates the illusion of a slimmer, more defined nose. Keep the application narrow, a wide nose highlight makes the nose appear wider.
Step 5, Cupid’s Bow
Apply a touch of highlight to the two peaks of the upper lip. This creates fullness and draws the eye to the lips. Particularly effective before applying lipstick.
Step 6, Centre of the Forehead and Chin (Optional)
For a more dramatic glow, add a touch of highlight to the very centre of the forehead and the centre of the chin. This creates a more pronounced three-dimensional effect, best for photography and evening looks. If you’re transforming your daytime makeup into an evening style, this day-to-night makeup look guide shows how to refresh your makeup while keeping your highlighter looking flawless.
Highlighting for Different Skin Tones
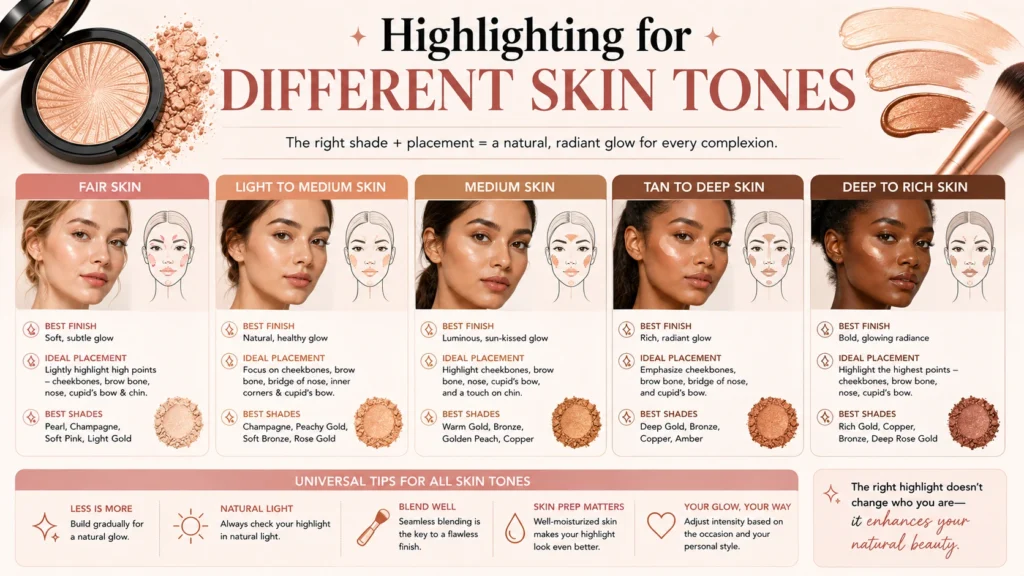
Fair Skin
Champagne, pearl, and pink-gold shades are most flattering. Avoid very warm gold or bronze, these can look orange against fair skin. Pearlescent and white-gold shimmers create the most natural glow.
Medium Skin
Gold, rose-gold, and peach-gold are all beautiful on medium tones. The warm shades complement medium skin’s natural warmth. This group has the most flexibility in shade choice.
Tan and Olive Skin
Bronze, copper, and deeper gold shimmers look stunning against tan and olive skin tones. These warm tones complement the natural golden undertone and create a luminous, sun-kissed glow.
Dark Skin
Rich gold, copper, bronze, and champagne shimmers are particularly striking on deep skin tones. Many standard highlighters appear grey or ashy on dark skin, look for warm-toned, highly pigmented formulas. Pat McGrath Skin Fetish Highlight, Fenty Beauty Killawatt Freestyle, and Danessa Myricks Illuminating Vision all work beautifully on dark skin.
Common Highlighting Mistakes
• Applying too low on the cheek, highlight the bone, not the apple
• Using too much product, build gradually, one layer at a time
• Choosing the wrong shade undertone, warm gold on cool skin looks orange
• Using chunky glitter formulas for everyday, save those for events
• Forgetting to blend the edges, harsh edges break the illusion
Once you’re comfortable with natural highlighting, you can incorporate these techniques into a full glam makeup tutorial for beginners to create a brighter, more defined makeup look for special occasions.
Final Thoughts
Highlighter at its best is invisible as a product but unmistakable in effect, skin that glows from within rather than glitter sitting on top of skin. The key is fine-particle formulas, correct placement on the high points, a light hand, and blended edges. Master these principles and highlighting becomes one of the most satisfying steps in any makeup routine.
Frequently Asked Questions
Q: Where should you apply highlighter?
A: The classic placement is: top of the cheekbones, brow bone, inner corner of the eyes, bridge of the nose, Cupid’s bow, and centre of the chin. These high points of the face catch the most natural light, so highlighting them mimics and amplifies the face’s natural luminosity.
Q: What highlighter finish is most natural?
A: A pearl or champagne shimmer with fine particles produces the most natural-looking glow, it catches light subtly without obvious glitter. Avoid large chunky glitter particles which look theatrical rather than natural. Cream highlighters are inherently more natural than powder.
Q: Can you apply highlighter with fingers?
A: Yes, and for cream highlighters, fingers are actually recommended. The warmth of your skin melts the product in, creating a seamless, skin-fused glow. Press gently with your ring finger rather than sweeping, which distributes the product too widely.
Q: Is highlighter suitable for oily skin?
A: Yes, but formula matters. Choose a matte or satin highlight rather than a high-glitter shimmer, the latter amplifies shine and can look greasy. A subtle satin sheen on the cheekbones looks intentional and polished on oily skin.
Q: What is the difference between highlighter and shimmer eyeshadow?
A: In practice, very little, many makeup artists use a shimmer eyeshadow as highlighter. Dedicated highlighters typically have more finely milled particles, are designed for skin contact on the face, and often come in larger quantities. A champagne shimmer eyeshadow pressed onto the cheekbone works perfectly as a highlighter.