


Yes, you can cover acne with makeup without creating a thick, cakey finish.
The secret is not always using the heaviest foundation you can find. In fact, applying too much foundation over every blemish can sometimes make acne look more noticeable. Thick layers may settle around bumps, emphasize dry patches, and create a mask-like finish.
The better approach is strategic coverage.
Instead of covering your entire face with a heavy layer, you can use lightweight skin preparation, a suitable foundation, targeted concealer, and careful blending. This method allows you to cover redness and blemishes while keeping the rest of your skin looking natural.
Many beginners make the same mistake. They see a pimple, apply a large amount of concealer, add more foundation, apply more concealer, and then cover everything with a thick layer of powder. At first, the blemish may look covered. However, after a few hours, the makeup can become dry, cracked, or cakey.
So, what is the professional solution?
Use less product in the right places.
Makeup can cover the appearance of redness, discoloration, and uneven tone. However, it cannot completely erase the physical texture of a raised pimple or acne scar. A realistic goal is to reduce the appearance of the blemish while allowing your skin to still look like skin.
This article explains exactly how to use makeup for acne in a simple, practical way. You will learn how to prepare acne-prone skin, choose the right products, cover active breakouts, hide acne marks, reduce the appearance of texture, avoid cakey foundation, and keep your makeup more comfortable throughout the day.
You will also discover professional makeup artist techniques, dermatologist-informed advice, budget-friendly product strategies, luxury alternatives, skin-type tips, seasonal advice, common myths, and a complete step-by-step routine.
Do you need full coverage everywhere?
Usually, no.
You need coverage where you want it and a lighter finish where you do not.
That small change can make your makeup look much more natural.
1. Can You Wear Makeup If You Have Acne?
Yes, people with acne can wear makeup. Having acne does not mean you need to avoid foundation, concealer, blush, or other cosmetics completely.
However, product choice and makeup hygiene matter.
Some cosmetics can contribute to breakouts in some people. This is why dermatologists often recommend looking for labels such as non-comedogenic, oil-free, or won’t clog pores when acne is a concern.
A real-life example makes this easier to understand. Imagine someone with acne-prone skin using a heavy foundation every day, sleeping in it at night, and cleaning their brushes only once every few months. Their breakouts may become more difficult to manage. The problem may not come from makeup alone, but poor product and hygiene habits can make the situation worse.
The American Academy of Dermatology explains that people with acne can wear makeup when they choose products carefully, remove makeup before bed, apply it gently, and keep makeup tools clean.
Makeup Does Not Need to Hide Every Part of Your Skin
A common beginner belief says that good makeup should make every blemish completely invisible. That expectation can lead to too much product.
Professional makeup artists often aim for balanced coverage. They may cover the redness of a pimple while allowing some natural texture to remain. This usually looks more realistic than creating a thick layer over every bump.
Reality Check: A raised pimple has physical texture. Makeup can reduce color and visibility, but it cannot always make the skin completely flat.
Mini conclusion: You can absolutely wear makeup with acne. The goal is to cover strategically, protect your skin, and avoid unnecessary layers.
2. Why Does Makeup Look Cakey Over Acne?

Cakey makeup usually happens when too much product builds up on the skin or when the skin underneath is not properly prepared.
Acne-prone skin can have several different concerns at once. One area may be oily, another may be dry from acne treatment, and a blemish may have flaky skin around it. When you apply the same thick foundation layer everywhere, the makeup may not behave evenly.
Common Causes of Cakey Makeup
| Problem | What Often Happens |
| Too much foundation | Makeup looks thick |
| Too much concealer | Blemishes look raised |
| Dry skin around a pimple | Makeup cracks |
| Excess powder | Skin looks flat and heavy |
| Wrong foundation formula | Makeup separates or emphasizes texture |
| Too many skincare layers | Makeup pills |
| Rubbing the product | Coverage moves away from the blemish |
Real-life example: A person notices three red pimples. They apply full-coverage foundation to the entire face, then add concealer over the pimples, and finally apply a lot of powder. The result may look heavier than necessary.
A professional makeup artist may use a lighter foundation layer and then apply a small amount of concealer only where extra coverage is needed.
Pro Tip: The best way to make acne coverage look natural is often to use the least amount of product needed to achieve your desired result.
Mini conclusion: Cakey makeup usually comes from excess product, poor preparation, or the wrong formula rather than acne itself.
3. How to Prepare Acne-Prone Skin Before Makeup
Good skin preparation can make a major difference in how makeup sits on acne-prone skin.
Begin with clean hands and a gentle skincare routine. If your skin feels tight, dry, or flaky, use a suitable moisturizer. If your skin becomes oily quickly, choose a lightweight formula instead of skipping moisturizer completely.
The AAD recommends gentle cleansing and avoiding habits that irritate acne-prone skin. Over-washing and aggressive scrubbing can irritate the skin and may make breakouts more difficult to manage.
A Simple Pre-Makeup Routine
- Wash your hands.
- Cleanse gently if needed.
- Apply acne treatment according to your skincare plan.
- Use a suitable moisturizer.
- Apply sunscreen during the day.
- Allow products to settle.
- Apply primer only if necessary.
Common mistake: Applying harsh acne products immediately before makeup because you want the pimple to disappear quickly.
That approach may leave the skin dry and irritated. Then, foundation may cling to the dry surface and make the blemish more obvious.
Expert Advice: Makeup should work with your skincare routine, not fight against it. If you want to learn more about creating a professional base before makeup, explore these professional makeup tips for skin preparation.
Mini conclusion: Comfortable, well-prepared skin creates a better surface for natural-looking acne coverage.
4. How to Choose Acne-Friendly Makeup Products
Choosing makeup for acne-prone skin requires more than simply searching for “full coverage.”
Look for products that suit your skin type and are labeled non-comedogenic or won’t clog pores when appropriate. However, remember that no label guarantees that a product will work perfectly for every person.
Everyone’s skin can respond differently.
Product Selection Checklist
Before buying makeup, ask:
- Is the product suitable for acne-prone skin?
- Does the formula feel too heavy for your skin?
- Is the finish appropriate for your skin type?
- Can you remove it easily at night?
- Does the product make your skin feel irritated?
- Can you use a small amount and build coverage?
A product that looks beautiful on one person may not work well for another. For example, a rich cream foundation may look smooth on dry skin but feel heavy on oily skin. If you are new to makeup and need help building a basic collection, explore these makeup products beginners should buy first.
Beauty expert advice: Focus on formula, finish, and how the product behaves on your own skin instead of buying a product only because it is popular online.
Quick Tip: Always test a new product before an important event. Your skin needs time to show you how it reacts.
Mini conclusion: The right product is not necessarily the most expensive or the most full coverage. It is the one that gives you the finish and comfort you need.
5. How to Choose the Right Foundation for Acne-Prone Skin

The best foundation for acne-prone skin depends on your coverage needs, skin type, and desired finish.
If you have a few blemishes but mostly even skin, a light or medium-coverage foundation may work well. You can then use concealer only on individual spots.
If you have widespread redness or many dark marks, a medium-to-full coverage foundation may be more practical.
Foundation Finish Guide
| Skin Concern | Finish to Consider |
| Dry acne-prone skin | Natural or hydrating |
| Oily acne-prone skin | Natural matte or soft matte |
| Combination skin | Natural finish with targeted powder |
| Textured skin | Thin, flexible layers |
| Redness | Medium buildable coverage |
Real-life example: If you have five blemishes but your cheeks are clear, full coverage across your entire face may be unnecessary. A medium foundation plus spot concealing can create a more natural result.
Professional makeup artists often build coverage slowly. They do not automatically apply the maximum amount of product.
Common Mistake: Choosing the thickest foundation because you think more coverage always means better acne coverage.
Mini conclusion: Choose the lightest foundation that gives you enough overall coverage, then use concealer for specific areas.
6. How to Cover Active Pimples Step by Step
Active pimples can be difficult to cover because they may be red, raised, tender, or flaky.
The key is to avoid rubbing the area repeatedly.
Step-by-Step Method
Step 1: Prepare the Area
Make sure the skin is clean and comfortable. If the area is extremely dry, use a small amount of suitable moisturizer.
Step 2: Apply a Thin Foundation Layer
Use a small amount of foundation around the face. Do not immediately pile product onto the pimple.
Step 3: Spot Conceal
Use a small brush or clean fingertip to place a tiny amount of concealer directly on the blemish.
Step 4: Press, Do Not Rub
Tap around the edges while leaving the center covered.
Step 5: Set Carefully
Use a small amount of powder only if needed.
Professional trick: Let the concealer sit for a few seconds before blending the edges. This can help you avoid spreading all the product away from the blemish.
Before and After Scenario
Before: A bright red pimple stands out against otherwise even skin.
After: The face receives a thin foundation layer, the redness receives targeted concealer, and the rest of the skin remains lighter.
Bonus Trick: If the pimple is raised, focus on reducing redness rather than trying to create a thick, perfectly flat layer.
Mini conclusion: Spot concealing gives you coverage without covering the entire face in heavy product.
7. How to Cover Red Acne Marks
Red acne marks can often be easier to cover than raised active pimples because the main concern is color rather than texture.
Start with your regular foundation. Then check whether the redness still shows through.
If it does, use a small amount of concealer only on those areas.
Why Thin Layers Work Better
A thick layer may look smooth at first but can become obvious when you move, smile, or touch your face.
A thin layer of foundation combined with targeted concealer usually looks more natural.
Real-life example: Instead of applying a thick layer of foundation to hide redness around the cheeks, apply a medium layer and use a small brush to add coverage only to the red areas.
Pro Tip: Step away from the mirror occasionally. Looking at your face from a very close distance can make you apply more product than anyone else will see.
Mini conclusion: Red marks usually need targeted color coverage, not a thick layer over the whole face.
8. How to Hide Dark Acne Marks and Hyperpigmentation
Dark acne marks can create uneven skin tone. These marks may require more coverage than mild redness, but the same principle still applies: build slowly.
Choose a foundation shade that matches your skin rather than using a lighter shade to make dark marks disappear. Choosing the right base shade can also help create more natural-looking coverage, so learn how to choose the right foundation shade for your skin tone. A foundation that is too light can make the covered area look gray or unnatural.
A Simple Coverage Method
- Apply your foundation evenly.
- Identify the marks that still show.
- Use a matching concealer.
- Tap it onto the mark.
- Blend only the edges.
- Set lightly if needed.
Common mistake: Using a very light concealer on dark marks.
This may create a visible patch instead of natural coverage.
Expert Advice: Color correction can help with strong discoloration, but you usually need less corrector than you think.
Mini conclusion: Match the skin tone first, then add targeted coverage to dark marks.
9. How to Cover Acne Scars and Uneven Texture
Acne scars can include both discoloration and physical texture. Makeup can often cover color more easily than texture.
If a scar is indented, raised, or uneven, applying more foundation may not make it disappear. Instead, the extra product may collect in the texture.
How to Make Textured Skin Look More Natural
- Use thin layers.
- Avoid excessive powder.
- Press makeup instead of rubbing.
- Choose a flexible foundation.
- Use a smoothing primer only where needed.
- Do not keep adding product to one small area.
Real-life example: A person applies several layers of foundation over an indented scar. The scar still appears, but the makeup around it now looks thick. A lighter layer may create a more balanced result.
Reality Check: Real skin has texture. Natural-looking makeup does not require completely invisible pores or scars.
Mini conclusion: For textured acne scars, the goal is balance and softness, not endless layers.
10. Should You Use Green Color Corrector for Acne?
Green color corrector can help reduce the appearance of strong red tones because green and red sit opposite each other on the color wheel.
However, you do not need green corrector for every pimple.
A common beginner mistake is applying a thick green layer over the entire face. This can create a gray or unnatural appearance once foundation is applied.
How to Use Green Corrector
- Apply a tiny amount to the red area.
- Blend the edges.
- Apply foundation over it.
- Add concealer only if needed.
Professional makeup artist trick: Use the smallest amount that changes the appearance of the redness. More corrector does not automatically create better correction.
Common mistake: Applying green corrector everywhere when only a few areas are red.
Mini conclusion: Green corrector can be useful, but targeted application is essential.
11. How to Apply Foundation Without Looking Cakey
Foundation application matters just as much as the foundation itself.
Begin with a small amount. Apply it to the center of the face and blend outward. Then check your coverage.
Do you still need more?
If yes, add another thin layer only where necessary.
Brush vs Sponge
| Tool | Best For |
| Brush | Building coverage |
| Damp sponge | Softening and pressing |
| Fingers | Small areas and warmth |
A professional makeup artist may use more than one tool. For example, they may apply foundation with a brush and then lightly press with a damp sponge to soften excess product.
Pro Tip: Do not keep blending a blemish until the product disappears. Blend around the edges while keeping coverage in the center.
Mini conclusion: Thin layers and controlled application help prevent a heavy finish.
12. How to Use Concealer for Acne
Concealer is one of the most useful products for acne coverage because it allows you to cover individual blemishes without applying heavy foundation everywhere.
The most important rule is to choose the right shade.
For active redness, a concealer that matches your skin tone often works well. For dark marks, the shade should still blend naturally with the surrounding skin.
Spot Concealing Technique
- Apply a tiny dot.
- Wait briefly.
- Tap around the edges.
- Leave the center covered.
- Set lightly if needed.
Common mistake: Applying a large triangle of concealer over a tiny pimple.
That technique uses much more product than necessary.
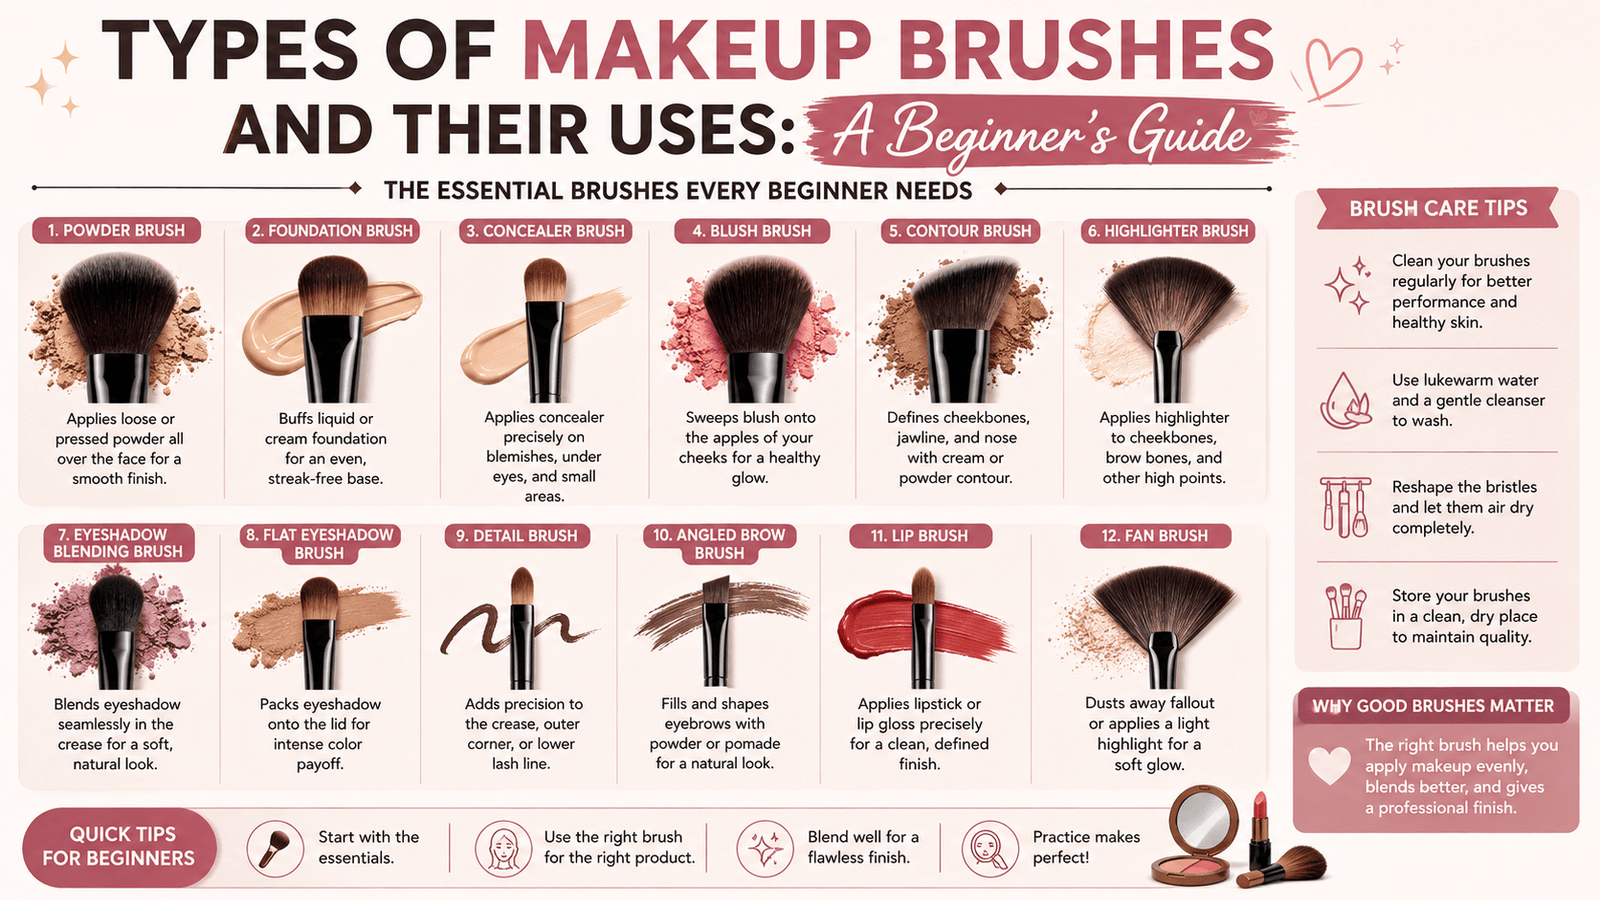
Quick Tip: A small pointed brush can give you better control than a large fluffy brush when covering individual blemishes.
Mini conclusion: Concealer should add precision, not unnecessary thickness.
13. Best Makeup Tools for Acne-Prone Skin
Your makeup tools touch your skin repeatedly, so hygiene matters.
Dirty brushes and sponges can collect oil, makeup residue, dead skin cells, and microorganisms. The AAD recommends cleaning makeup brushes regularly and not sharing makeup tools.
Tool Comparison
| Tool | Advantage | Important Habit |
| Brush | Precise coverage | Clean regularly |
| Sponge | Soft pressing | Wash and dry properly |
| Small concealer brush | Spot coverage | Avoid sharing |
| Fingers | Convenient | Wash hands first |
Real-life example: Someone uses the same dirty concealer brush on multiple breakouts every day. Even if the makeup itself is suitable, poor tool hygiene can create unnecessary problems.
Expert Advice: Clean your tools regularly and replace products or applicators when they become old, damaged, or difficult to clean.
Mini conclusion: Good makeup hygiene is part of good acne makeup.
14. Makeup for Different Acne-Prone Skin Types
Acne-prone skin does not always look the same.
Some people have oily skin and active breakouts. Others have dry skin because of acne treatments. Some have combination skin with oil in the T-zone and dryness around the cheeks.
Skin Type Guide
| Skin Type | Makeup Approach |
| Oily acne-prone | Lightweight layers and targeted powder |
| Dry acne-prone | Gentle hydration and flexible formulas |
| Combination | Different techniques in different areas |
| Sensitive | Simple routine and familiar products |
| Textured | Thin layers and minimal powder |
Oily Skin
Use lightweight products and avoid applying thick layers of powder everywhere. Too much powder can make the skin look flat and emphasize texture.
Dry Skin
Prepare the skin with suitable moisturizer. Avoid applying heavy foundation over flaky areas without preparation.
Combination Skin
Use different amounts of product on different parts of the face.
Mini conclusion: Your skin type should influence both your product choice and your application method.
15. How to Make Acne Makeup Last Longer
Long-lasting makeup does not require applying a thick layer. For more practical techniques, learn how to make makeup last all day without relying on heavy layers.
Instead, focus on preparation, formula compatibility, and controlled setting.
Long-Wear Tips
- Start with clean, prepared skin.
- Use suitable skincare.
- Avoid excessive moisturizer.
- Apply thin makeup layers.
- Set oily areas selectively.
- Use setting spray if it suits your routine.
- Avoid touching your face repeatedly.
Professional trick: Use powder only where makeup tends to move. Applying powder to the entire face can make dry or textured areas look heavier.
Common mistake: Reapplying foundation repeatedly during the day.
Instead, remove excess oil gently and touch up only where needed.
Bonus Trick: Carry a small amount of concealer for targeted touch-ups instead of adding another full layer of foundation.
Mini conclusion: Strategic touch-ups usually look better than rebuilding the entire makeup base.
16. Common Makeup Mistakes People With Acne Make
Mistake 1: Using Too Much Foundation
More product does not always equal more attractive coverage.
Mistake 2: Applying Concealer Everywhere
Concealer should usually be targeted.
Mistake 3: Scrubbing the Skin Before Makeup
Aggressive scrubbing can cause irritation.
Mistake 4: Picking at Pimples
Picking can worsen inflammation and make makeup application more difficult.
Mistake 5: Sleeping in Makeup
Even makeup labeled non-comedogenic should be removed before bed.
Mistake 6: Sharing Makeup
Sharing can transfer oil, bacteria, and other microorganisms.
Mistake 7: Using Dirty Brushes
Dirty tools can collect residue and contribute to poor hygiene.
Mistake 8: Choosing the Wrong Shade
A mismatched foundation can make acne marks look more obvious.
Mini conclusion: Avoiding simple mistakes can improve your makeup more than buying another product.
17. Professional Makeup Artist Tips
Professional makeup artists often focus on technique rather than simply using more coverage.
Tip 1: Use a Thin Base
Start light and build.
Tip 2: Spot Conceal
Cover individual blemishes separately.
Tip 3: Match the Skin
Avoid very light concealer on dark marks.
Tip 4: Press Products Into the Skin
Pressing can create a more controlled finish than aggressive rubbing.
Tip 5: Check Different Lighting
Makeup can look different indoors and outdoors.
Tip 6: Stop When the Makeup Looks Balanced
Do not continue adding product just because you can still see a tiny amount of texture up close.
Professional Mindset: Makeup should help you feel confident, not force you to chase completely poreless skin.
Mini conclusion: The best professional makeup techniques often involve restraint.
18. Budget vs Luxury Makeup for Acne
You do not need expensive makeup to cover acne beautifully.
A simple routine can include:
- Gentle moisturizer
- Suitable sunscreen
- Foundation
- Concealer
- Powder if needed
- Clean tools
Budget products can work very well when the formula suits your skin and the shade matches correctly.
Where Luxury Products May Offer Extra Value
Some higher-priced products may offer:
- More shade options
- Different finish choices
- Specialized formulas
- Better packaging
- More advanced textures
However, price alone does not guarantee that a product will suit acne-prone skin.
Current beauty-industry research shows that consumers are increasingly focused on value and whether products truly perform rather than simply choosing products because they are expensive. The global beauty industry remains large and continues to grow, but consumers are becoming more selective about what they buy.
Mini conclusion: Spend more only when a product gives you a real benefit.
19. Seasonal Makeup Advice for Acne-Prone Skin
Summer
Heat and humidity can increase sweat and shine. Use lightweight layers and avoid excessive cream products if they feel uncomfortable.
Winter
Cold, dry air can make acne-prone skin feel flaky. Focus on suitable hydration and avoid over-powdering.
Spring
If your skin changes with the weather, adjust your skincare and makeup gradually.
Autumn
You may need more moisturizer as the air becomes cooler and drier.
Real-life example: A foundation that works beautifully in winter may feel too heavy in hot, humid weather.
Quick Tip: Your makeup routine does not need to stay exactly the same throughout the year.
Mini conclusion: Seasonal changes can affect both your skin and your makeup finish.
20. Common Myths About Makeup and Acne
Myth 1: Makeup Always Causes Acne
Not necessarily. Product choice, skin type, hygiene, and makeup removal all matter.
Myth 2: Full Coverage Is Always Best
No. Targeted coverage can look more natural.
Myth 3: Oily Skin Should Avoid Moisturizer
Oily skin can still become dehydrated.
Myth 4: Green Corrector Is Required for Every Red Pimple
Not always. A matching concealer may be enough.
Myth 5: More Powder Makes Makeup Last Longer
Too much powder can emphasize dryness and texture.
Myth 6: Acne Must Be Completely Invisible
Real skin has texture. Makeup should help you feel confident, not create impossible expectations.
Mini conclusion: Good acne makeup comes from practical techniques, not unrealistic beauty myths.
21. Step-by-Step Makeup Routine for Acne
Here is a simple routine you can follow.
Step 1: Clean Your Hands
Always begin with clean hands.
Step 2: Prepare Your Skin
Cleanse gently if needed and apply suitable skincare.
Step 3: Moisturize
Use a comfortable moisturizer appropriate for your skin type.
Step 4: Apply Sunscreen During the Day
Use a suitable broad-spectrum sunscreen as part of your daytime routine.
Step 5: Apply Primer Only If Needed
Use it on areas where it solves a specific problem.
Step 6: Apply a Thin Foundation Layer
Blend gently across the face.
Step 7: Spot Conceal
Add coverage only to areas that still need it.
Step 8: Color Correct If Necessary
Use a tiny amount of corrector for strong discoloration.
Step 9: Set Selectively
Use powder only where makeup needs extra control.
Step 10: Finish Lightly
Use setting spray if it works well with your products.
Step 11: Remove Makeup at Night
Never treat makeup removal as optional.
Mini conclusion: A controlled routine creates better results than applying multiple heavy layers.
22. Makeup Do’s and Don’ts for Acne
| Do | Don’t |
| Use non-comedogenic products when appropriate | Assume every product will suit your skin |
| Apply thin layers | Pile on foundation |
| Spot conceal | Cover every blemish with thick concealer |
| Clean makeup tools | Use dirty brushes |
| Remove makeup before bed | Sleep in makeup |
| Match your foundation shade | Use a very light shade to hide dark marks |
| Use clean hands | Touch your face constantly |
| Keep skincare gentle | Scrub aggressively |
Final Thoughts
Acne does not mean you cannot enjoy makeup.
You can wear foundation. You can use concealer. You can create soft glam looks, everyday makeup, party makeup, and full-glam makeup while still taking care of acne-prone skin.
The key is learning how to use makeup with control.
Start with good skin preparation. Choose products that suit your skin. Apply foundation in thin layers. Use concealer only where you need extra coverage. Blend carefully, and do not keep adding product simply because you can still see a tiny amount of texture up close.
Most importantly, remember that real skin has texture.
A pimple does not make you unattractive. Acne scars do not take away your beauty. Makeup should be a tool that helps you express yourself and feel more confident, not something that forces you to chase impossible perfection.
Build a gentle, healthy skincare routine. Keep your makeup tools clean. Remove your makeup every night. If acne is persistent, painful, severe, or affecting your confidence, consider speaking with a qualified dermatologist.
Then, when you apply your makeup, focus on balance rather than perfection.
The best makeup for acne is not the makeup that hides every trace of real skin. It is the makeup that helps you feel confident, comfortable, and completely yourself.
Frequently Asked Questions
1. What is the best makeup for acne-prone skin?
Choose lightweight, buildable, non-comedogenic products that suit your skin type. Always remove makeup before bed.
2. How can I cover a pimple without making it cakey?
Apply a thin foundation layer, then use a small amount of concealer directly on the blemish. Blend only the edges.
3. Is full-coverage foundation bad for acne?
Not necessarily. It can work well when applied in a thin layer and removed properly.
4. Can makeup make acne worse?
Some products may contribute to breakouts. Choose non-comedogenic makeup, clean your tools, and avoid sharing products.
5. How do I cover acne scars with makeup?
Use foundation and targeted concealer for discoloration. For textured scars, apply thin layers and avoid excessive powder.










1 Comment
[…] Test a new formula on a small area if your skin reacts easily. Stop using it if you develop strong burning, swelling, or a rash. See a dermatologist if the reaction continues. […]