

Have you ever watched a professional makeup artist create a smooth, glowing makeup look and wondered, “How does the foundation look so perfect?”
Many people assume the secret comes from an expensive foundation, a special brush, or a professional-only product. However, professional makeup artists often begin with something much simpler: proper skin preparation.
Before applying foundation, concealer, blush, or eyeshadow, makeup artists look at the condition of the skin. Is it dry? Oily? Dehydrated? Sensitive? Textured? Has the client used too many skincare products? Does the skin need moisture, oil control, or simply a gentle cleanse?
These questions matter because makeup sits on the skin. If the skin feels dry and flaky, foundation may emphasize texture. If the skin has too much oil, makeup may move or separate. If someone applies too many skincare layers, products may pill underneath makeup.
That is why professional makeup tips often begin before the makeup actually starts. If your foundation still looks uneven after proper skin preparation, understanding why foundation looks patchy and how to fix it can help you identify the real problem.
A good skin preparation routine does not need to be expensive or complicated. In fact, professional artists often use fewer products than beginners expect. The goal is to create a clean, comfortable, balanced surface without irritating the skin or adding unnecessary layers.
Dermatology guidance also supports the importance of suitable skin care. The American Academy of Dermatology recommends choosing moisturizers based on skin needs and highlights ingredients such as ceramides and hyaluronic acid for hydration. It also recommends daily broad-spectrum sun protection with SPF 30 or higher.
The skin barrier matters, too. Research describes moisturizers as working through different types of ingredients, including humectants that attract water, emollients that soften the skin, and occlusives that help reduce moisture loss.
In this guide, you will learn exactly how professional makeup artists prepare skin before makeup. You will discover a step-by-step routine, product selection tips, skin-type advice, professional tricks, dermatologist-informed guidance, budget options, luxury alternatives, seasonal advice, and common mistakes to avoid.
So, what should you do before picking up your foundation brush?
Let’s start with the most important step: understanding the skin in front of you.
1. Why Does Skin Preparation Matter Before Makeup?
Professional makeup artists prepare the skin because makeup looks and wears differently on different skin surfaces. A foundation may look smooth on well-moisturized skin but patchy on dry areas. Similarly, a creamy product may slide on skin with excess oil. Good skin preparation helps makeup sit more evenly and makes application easier.
Real-life example: Imagine applying paint to a dusty, cracked wall. The paint may still cover the surface, but the final result will not look smooth. Skin preparation works in a similar way. You do not need to create “perfect” skin. Instead, you want to create a comfortable base that allows makeup to perform better.
Professional makeup artists also understand that more skincare does not always mean better makeup. A beginner may apply cleanser, toner, essence, serum, face oil, moisturizer, sunscreen, and primer within a few minutes. The result may be pilling, heaviness, or makeup separation.
Reality Check: The best skin prep routine is not the longest routine. It is the routine that gives your skin what it needs without creating unnecessary layers.
Mini conclusion: Skin preparation helps improve comfort, texture, and makeup performance, but the right routine depends on your skin.
2. How Professional Makeup Artists Assess the Skin
Before professional makeup artists choose products, they often look closely at the skin. They may notice dryness around the nose, oiliness in the T-zone, visible texture, sensitivity, or areas that need extra hydration.
You can do the same at home. Look at your skin without makeup and ask: What does my skin need today? Your answer may change from day to day.
A Simple Skin Assessment
| What You Notice | What Your Skin May Need |
| Tightness | More hydration or moisturizer |
| Flaking | Gentle care and barrier support |
| Excess shine | Lightweight hydration and targeted oil control |
| Redness or stinging | A simpler, gentler routine |
| Makeup pilling | Fewer layers or better product compatibility |
| Rough texture | Consistent skincare rather than harsh scrubbing |
A professional makeup artist trick is to avoid treating the entire face exactly the same way. You can use more moisturizer on dry cheeks and less on an oily forehead. This technique is called targeted preparation.
Common mistake: Using one heavy moisturizer across the entire face because your cheeks feel dry.
Better practice: Apply products according to what each area actually needs.
Mini conclusion: Good professional makeup tips begin with observation. Before choosing a product, understand your skin.
3. Step 1: Cleanse the Skin Gently
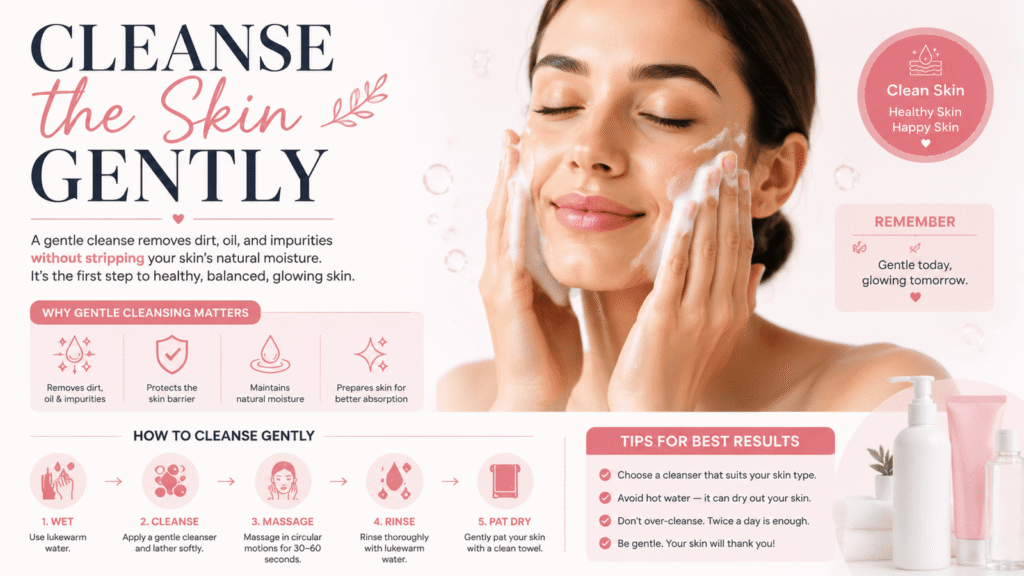
Professional makeup artists usually begin with clean skin. However, “clean” does not mean aggressively scrubbed or stripped of every natural oil.
A gentle cleanser can remove excess oil, sweat, leftover skincare, and surface debris. The goal is to create a fresh base without causing tightness or irritation.
How to Cleanse Before Makeup
- Wash your hands.
- Use a gentle cleanser suitable for your skin.
- Rinse with comfortable water.
- Pat the skin dry.
- Avoid rubbing the face harshly with a towel.
Real-life example: If you cleanse aggressively because you want your skin to feel “extra clean,” your face may feel tight. Then you may apply too much moisturizer to compensate. That extra layer can make makeup pill.
The American Academy of Dermatology recommends gentle skin care practices and choosing products that suit your skin’s needs. If your skin feels uncomfortable after cleansing, your cleanser may be too harsh for your routine.
Quick Tip: If your face already feels clean and comfortable, you may not need a complicated cleansing routine immediately before makeup.
Mini conclusion: Clean skin is important, but gentle cleansing is better than aggressive cleansing.
4. Step 2: Use Targeted Hydration
After cleansing, professional makeup artists often focus on hydration. Hydration helps the skin feel more comfortable and can improve how certain makeup products spread.
However, hydration and oil are not the same thing. A person with oily skin can still have dehydrated skin. This is why skipping all moisturizer may not solve oiliness.
Helpful Hydrating Ingredients
| Ingredient | Main Function |
| Hyaluronic acid | Helps attract and hold water |
| Glycerin | Helps draw moisture toward the skin |
| Ceramides | Support the skin barrier |
| Squalane | Helps soften and reduce dryness |
| Colloidal oatmeal | Can help soothe some dry or irritated skin |
The AAD highlights ingredients such as ceramides and hyaluronic acid in moisturizers, while Cleveland Clinic explains that humectants, emollients, and occlusives support different parts of the moisturizing process.
Professional trick: If your skin feels dehydrated, apply a lightweight hydrating product before moisturizer instead of immediately applying a thick cream.
Common mistake: Using several hydrating serums at once and assuming more layers will always improve the result.
Mini conclusion: Good hydration should make the skin feel comfortable, not sticky or overloaded.
5. Step 3: Apply Moisturizer Correctly
Moisturizer is one of the most important parts of pre-makeup skincare. It helps soften the skin and can reduce the uncomfortable feeling that causes makeup to cling to dry areas.
The best moisturizer depends on your skin type. A rich cream may suit dry skin, while a lightweight lotion or gel may feel more comfortable on oily skin.Once your skin is properly prepared, choosing the right shade is equally important. Learn how to choose the right foundation shade for your skin tone for a more natural-looking base.
How Much Moisturizer Should You Use?
Use enough to cover the skin comfortably without leaving a thick, greasy layer.
Apply it gently rather than aggressively rubbing the face. Then give the product time to settle.
Research on the skin barrier explains that moisturizers can support skin function through humectants, emollients, occlusives, and barrier-supporting lipids.
Before scenario: Foundation catches around the mouth and cheeks.
After scenario: A suitable moisturizer is applied before makeup, allowed to settle, and foundation is applied in a thinner layer.
Expert Advice: If your makeup repeatedly looks dry, first examine your skincare and application technique before immediately buying a new foundation.
Mini conclusion: Moisturizer creates comfort, but the best amount is the amount your skin needs.
6. Step 4: Use Sunscreen for Daytime Makeup
If you are applying makeup during the day and will be exposed to sunlight, sunscreen belongs in your skincare routine.
The AAD recommends broad-spectrum sunscreen with SPF 30 or higher as part of daily sun protection. It also recommends using other sun-protective habits, such as seeking shade and wearing protective clothing when appropriate.
How to Layer Sunscreen Before Makeup
- Complete your basic skincare.
- Apply sunscreen evenly.
- Allow it to settle.
- Apply primer or makeup if needed.
Common mistake: Applying sunscreen only to the face and forgetting exposed areas such as the neck.
Another common mistake: Applying too many products immediately on top of sunscreen before it settles.
Pro Tip: If your sunscreen causes makeup to pill, review the products underneath it and give each layer more time to settle. You may also need to choose formulas that work better together.
Mini conclusion: Daytime skin preparation should support both makeup application and long-term skin care.
7. Step 5: Decide Whether You Need Primer
Primer can be useful, but it is not required for every makeup routine. If you are unsure whether this step belongs in your routine, learn more about whether primer is necessary before makeup and when it can actually be helpful.
Professional makeup artists often use primer strategically. They may apply a hydrating primer to dry areas, a smoothing primer where texture is visible, or an oil-control primer in areas where makeup tends to move.
Primer Selection Guide
| Skin or Makeup Concern | Primer Type to Consider |
| Dryness | Hydrating |
| Visible pores | Smoothing |
| Excess shine | Oil-control |
| Makeup fading | Long-wear |
| Dull appearance | Radiance-enhancing |
Real-life example: A beginner applies a thick layer of primer over the entire face. Foundation begins to roll into small pieces. The problem may not be the foundation; there may simply be too much product underneath.
Reality Check: Primer should solve a problem. If your makeup already applies beautifully without it, you may not need another layer.
Mini conclusion: Primer is a tool, not a compulsory step.
8. How to Prepare Different Skin Types
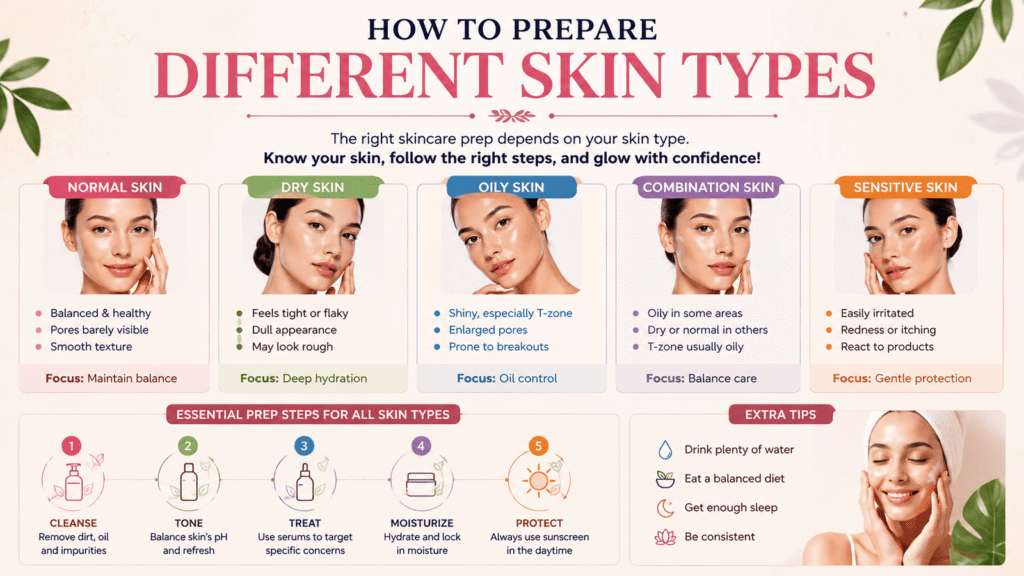
Every skin type needs a slightly different approach. A routine that works for dry skin may feel too heavy on oily skin. Similarly, a strong oil-control routine may feel uncomfortable on sensitive skin.
The goal is balance.
Skin Type Preparation Guide
| Skin Type | Best Approach |
| Dry | Hydrate and moisturize comfortably |
| Oily | Use lightweight hydration and targeted oil control |
| Combination | Use different textures in different areas |
| Sensitive | Keep the routine simple and gentle |
| Acne-prone | Choose suitable products and maintain hygiene |
| Normal | Adjust based on seasonal changes |
Professional makeup artists often customize the routine instead of using the same products on every client. This is one of the most useful professional makeup tips beginners can learn.
Common mistake: Assuming that oily skin needs no moisturizer or that dry skin needs the heaviest cream available.
Mini conclusion: Skin preparation works best when you respond to your actual skin instead of following a fixed routine blindly.
9. How to Prepare Dry and Dehydrated Skin
Dry and dehydrated skin can make makeup look rough, flaky, or uneven. However, applying a very thick layer of oil immediately before makeup may not solve the problem.
Start with gentle cleansing and comfortable hydration. Then apply a moisturizer that helps soften the skin. Ingredients such as ceramides, glycerin, hyaluronic acid, and other moisturizing agents may be useful depending on your skin and product formula.
Professional Trick for Dry Areas
Apply a little extra moisturizer to areas that become flaky, such as the sides of the nose or cheeks. Avoid putting a heavy layer everywhere if some areas of your face do not need it.
Before: Foundation looks cracked around the nose.
After: The area receives gentle preparation, the moisturizer settles, and foundation is applied in a thin layer.
Bonus Trick: Do not aggressively scrub dry skin immediately before makeup. Irritation can make the surface look worse.
Mini conclusion: Dry skin usually benefits from gentle care, hydration, and controlled product layering.
10. How to Prepare Oily and Combination Skin
Oily skin still needs hydration. Skipping moisturizer can leave the skin uncomfortable and may encourage people to apply excessive powder later.
Instead, use a lightweight moisturizer and focus oil-control products only where you need them.
For combination skin, targeted preparation often works well. You might apply a lighter product to the forehead and nose while using a more nourishing moisturizer on the cheeks.
Real-life example: A person with combination skin uses one thick cream across the entire face. The cheeks feel comfortable, but the forehead becomes shiny quickly. A more targeted routine may work better.
Professional trick: Apply less product to areas where makeup tends to move.
Quick Tip: Do not try to make every part of your face look completely matte. Natural skin has some variation.
Mini conclusion: Oily and combination skin need balance, not aggressive drying.
11. How to Prepare Sensitive and Acne-Prone Skin
Sensitive skin often benefits from a simpler routine. Adding several new products before an important event can make it difficult to identify what causes irritation.
If your skin is acne-prone, product selection and hygiene matter. The AAD recommends considering products labeled “non-comedogenic” or “won’t clog pores” when acne is a concern. It also emphasizes removing makeup before bed and cleaning makeup tools regularly.
A Gentle Approach
- Use familiar products before important events.
- Avoid harsh scrubbing.
- Do not pick at active blemishes before makeup.
- Clean your brushes.
- Remove makeup at night.
- Stop using products that repeatedly cause irritation.
Common mistake: Trying a strong exfoliating product for the first time on the morning of an event.
Expert advice: If you have persistent acne, severe irritation, or a recurring skin reaction, a qualified dermatologist can help you choose a suitable treatment plan.
Mini conclusion: Sensitive and acne-prone skin usually benefits from consistency, gentle care, and careful product choices.
12. Should You Exfoliate Before Makeup?
Exfoliation can help improve the appearance of rough texture over time, but it is not always a good idea immediately before makeup.
A common beginner mistake is scrubbing aggressively because they want instant smoothness. This can leave the skin irritated, red, or uncomfortable.
When Should You Exfoliate?
If exfoliation is already part of your routine and your skin tolerates it, follow your product instructions. Avoid trying a new exfoliant right before an important event.
The AAD notes that skincare products should be selected according to skin concerns, and certain exfoliating ingredients may be useful for specific skin types. For example, its guidance on facial masks mentions AHAs, BHAs, and other ingredients for different concerns.
Common Mistake: Believing that stronger exfoliation always creates smoother makeup.
Mini conclusion: Smooth-looking makeup usually comes from consistent skincare, not aggressive last-minute exfoliation.
13. Should You Use a Face Mask Before Makeup?
A face mask can be helpful when it matches your skin’s needs, but it is not essential.
A hydrating mask may feel useful for dry skin, while certain masks may help absorb excess oil. The AAD recommends choosing mask ingredients according to skin concerns and warns that masks can cause irritation if they contain ingredients that do not suit your skin.
Before an Important Event
Use only products you already know your skin tolerates. A new mask may cause redness, dryness, or irritation.
Professional makeup artist trick: If you use a mask, keep the rest of your routine simple afterward. You do not need to layer many additional products.
Before: A person uses a strong clay mask, exfoliating toner, and retinol before a party.
After: Their skin feels dry and irritated, making makeup more difficult.
Better approach: Use a familiar, gentle product and allow the skin to settle.
Mini conclusion: A face mask can be optional support, not a requirement for professional-looking makeup.
14. Professional Makeup Artist Skin Prep Tricks
Professional makeup artists often use small techniques that make a big difference.
Trick 1: Use Less Product
More product does not automatically create better skin. Thin layers often look more natural.
Trick 2: Press Instead of Rub
When applying moisturizer or skincare, gentle pressing can help reduce unnecessary friction.
Trick 3: Target Different Areas
Use different amounts of product on different parts of the face.
Trick 4: Let Products Settle
Rushing between layers can create pilling.
Trick 5: Check the Skin in Natural Light
A bathroom mirror may not show the same texture as daylight.
Pro Tip: After skincare settles, lightly touch the skin. It should feel comfortable and hydrated, not excessively wet or slippery.
Mini conclusion: Professional makeup tips often involve control, timing, and observation rather than complicated products.
15. How Long Should You Wait Before Applying Makeup?
There is no universal waiting time that works for every product. The important question is whether your skincare has settled enough to allow makeup to apply smoothly.
If you immediately layer several products while each one is still wet, pilling may occur.
A Simple Layering Method
- Apply a thin layer.
- Give it time to settle.
- Check the skin.
- Apply the next product only if needed.
The exact timing depends on the texture and formula. Lightweight products may settle quickly, while richer creams may need more time.
Common mistake: Applying a thick moisturizer and immediately rubbing foundation over it.
Better practice: Use the right amount and allow the surface to feel comfortable before applying makeup.
Mini conclusion: Do not focus only on the clock. Focus on how the skin feels and how the products behave.
16. Common Skin Prep Mistakes
Mistake 1: Using Too Many Products
Too many layers can cause pilling and make makeup feel heavy.
Mistake 2: Skipping Moisturizer
Even oily skin may need hydration.
Mistake 3: Using Harsh Scrubs
Aggressive exfoliation can irritate the skin.
Mistake 4: Trying New Products Before an Event
You may not know how your skin will react.
Mistake 5: Applying Too Much Oil
Oil can affect how certain makeup products adhere.
Mistake 6: Forgetting the Neck
The face and neck can look different if you apply makeup only to the face.
Mistake 7: Ignoring Sunscreen
Daytime skin care should include appropriate sun protection.
Reality Check: Professional makeup artists do not try to “fix” every skin concern with makeup. They prepare the skin and then work with its natural features.
Mini conclusion: Avoiding basic mistakes can improve your makeup more than adding another product.
17. Ingredient Guide for Pre-Makeup Skincare
Understanding basic ingredient categories can help you choose products more wisely.
Humectants
Humectants help attract and hold water. Glycerin and hyaluronic acid are common examples.
Emollients
Emollients help soften the skin and improve the feel of rough areas.
Occlusives
Occlusives help reduce moisture loss by creating a protective layer.
Ceramides
Ceramides are lipids that support the skin barrier. Cleveland Clinic describes them as important components that help support healthy, hydrated skin.
Ingredient Comparison
| Ingredient Type | Main Role | Often Useful For |
| Humectants | Attract water | Dehydrated skin |
| Emollients | Soften skin | Dry or rough skin |
| Occlusives | Reduce water loss | Very dry areas |
| Ceramides | Support barrier | Dry or compromised skin |
| Niacinamide | Used in many formulas for multiple skin concerns | Depends on product and tolerance |
Common mistake: Assuming one ingredient works perfectly for everyone.
Expert advice: Product formulas contain multiple ingredients, so look at the complete product and your own skin response.
Mini conclusion: Ingredient knowledge helps you shop smarter, but your skin’s response remains important.
18. Budget vs Luxury Skin Preparation
You do not need a luxury skincare collection to prepare your skin well.
A basic routine can include:
- Gentle cleanser
- Suitable moisturizer
- Daytime sunscreen
- Optional targeted product
- Optional primer
That is enough for many people.
Where Might You Spend More?
Some people choose to spend more on:
- A moisturizer that feels especially comfortable.
- A sunscreen they enjoy using consistently.
- A professional facial before a special event.
- A targeted skincare product recommended by a dermatologist.
Where Can You Save?
You can often save by:
- Choosing simple formulas.
- Avoiding unnecessary duplicate products.
- Buying smaller sizes first.
- Using one product for a clear purpose.
McKinsey’s beauty research shows that consumers increasingly evaluate value carefully and often shop across different price points rather than choosing only luxury or only mass products.
Mini conclusion: Effective skin preparation is about choosing the right products, not the most expensive products.
19. Seasonal Skin Preparation Advice
Summer
Heat and humidity may increase sweat and oil. Use lightweight layers and avoid applying more product than necessary.
Winter
Cold, dry air may make skin feel tight or flaky. A richer moisturizer may feel more comfortable for some people.
Spring
If your skin becomes more sensitive due to environmental changes, keep your routine simple and avoid adding several new products at once.
Autumn
You may need to adjust your moisturizer as the weather becomes cooler and drier.
Professional makeup artist tip: Do not use the same skin prep routine all year if your skin clearly changes with the seasons.
Mini conclusion: Your makeup prep should adapt to your environment.
20. Step-by-Step Professional Skin Prep Routine
Here is a simple professional-inspired routine for beginners.
Step 1: Wash Your Hands
Clean hands help reduce the transfer of dirt and oils to your face.
Step 2: Cleanse Gently
Remove excess oil, sweat, and leftover products.
Step 3: Hydrate If Needed
Use a lightweight hydrating product if your skin feels dehydrated.
Step 4: Moisturize
Choose a texture that suits your skin.
Step 5: Apply Sunscreen During the Day
Use broad-spectrum SPF 30 or higher when appropriate for daytime sun exposure.
Step 6: Add Primer Only If Needed
Choose primer based on a specific concern.
Step 7: Allow Products to Settle
Avoid immediately rubbing foundation over wet layers.
Step 8: Begin Makeup
Start with a small amount of product and build gradually. After your base is ready, you can enhance your overall look with simple techniques such as easy tips to make your eyes look larger.
Mini conclusion: A professional skin prep routine can be simple, targeted, and practical.
21. Morning vs Event Makeup Preparation
Everyday Morning Routine
For daily makeup, keep your routine efficient:
- Cleanse if needed.
- Moisturize.
- Apply sunscreen.
- Use primer only if needed.
- Apply makeup.
Special Event Routine
For an event, prepare your skin earlier rather than trying aggressive treatments at the last minute.
A good event plan includes:
- Consistent skincare in the days before.
- No new harsh products immediately before the event.
- Enough time for skincare to settle.
- A makeup trial if the event is especially important.
Real-life example: A bride who tests her skincare and makeup weeks before the wedding has more time to identify problems than someone who tries everything for the first time on the wedding morning.
Expert Advice: The best event skin prep usually starts before the event day.
Mini conclusion: Consistency is often more valuable than last-minute beauty tricks.
22. Professional Makeup Artist Do’s and Don’ts
| Do | Don’t |
| Assess your skin first | Copy someone else’s routine blindly |
| Use suitable moisturizer | Skip hydration because you have oily skin |
| Apply sunscreen during daytime | Forget sun protection |
| Use primer strategically | Apply thick layers automatically |
| Let skincare settle | Rush between every step |
| Try new products early | Experiment right before an event |
| Keep tools clean | Use dirty brushes |
| Remove makeup at night | Sleep in makeup regularly |
Final Thoughts
The secret behind beautiful professional makeup often begins before the foundation is opened.
Professional makeup artists do not simply cover the skin. They prepare it, observe it, and adjust their technique according to its needs.
That is why one person’s perfect makeup routine may not work for someone else.
Start with a gentle cleanser. Give your skin the hydration it needs. Use a suitable moisturizer. Protect your skin from daytime sun exposure with broad-spectrum sunscreen when appropriate. Add primer only when it solves a real makeup problem.
Most importantly, build a healthy skincare routine that you can follow consistently.
You do not need perfect skin to wear beautiful makeup. You do not need a professional kit to learn professional techniques. With the right preparation, patience, and practice, you can create a smoother, more comfortable makeup base at home.
Prepare your skin with care, apply makeup with patience, and remember that the best makeup look begins with skin that feels healthy, comfortable, and well cared for.
Frequently Asked Questions
1. What do professional makeup artists apply before makeup?
They usually cleanse, hydrate, moisturize, and apply sunscreen during the day. Primer is added only when needed.
2. How should I prepare my skin before foundation?
Start with clean skin, apply suitable moisturizer and sunscreen, then let skincare settle before applying foundation.
3. Should I moisturize before makeup if I have oily skin?
Yes. Use a lightweight moisturizer to keep your skin comfortable without adding unnecessary heaviness.
4. Is primer necessary before makeup?
No. Primer is optional and is mainly used to address concerns like oiliness, dryness, pores, or makeup longevity.
5. How do professional makeup artists make foundation look smooth?
They prepare the skin properly, use suitable products, apply thin layers, and blend carefully for an even finish.